


34
B. After 5 to 10 roasts
1- Drum Removal
(Refer to diagram on page 7)
NOTE: For all tasks related to disassembly or repair of the Hottop Bean Roaster, we urge you to refer
to the Repair section of our website at www.hottopusa.com. There you will find illustrated, step-by-step
instructions to assist you.
Chaff and other small particles will accumulate in the roasting chamber after roasting several batches.
Large amounts of this dry material can ignite and start a fire inside the roaster. It is therefore very important
to check the roasting chamber, and if necessary, remove the drum and clean the entire roasting chamber
to be sure that chaff and other flammable particles are not building up in the roast chamber. The following
procedure describes how to remove the drum.
IMPORTANT: Please take care when following this procedure to remove the drum. You can damage
the machine, which may void the warranty, or cause a hazard not covered by the warranty. Use care not
to scratch the machine or damage the drum. It is heavy so take care when removing it. Also watch for
sharp edges on the drum and front plate. Wearing gloves for this procedure is recommended.
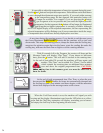
a. Start by removing the cooling tray (3), chaff-collecting tray (4), heat safety guards, and bean loading
cover (2) Now unscrew the gold knob (5) and take the front cover (6) off, as described above. It is
best to place all removed parts off to the side where they won’t get knocked off the counter or into the
sink.
b. Remove the four Phillips head screws (7) on the front plate (8) and store these, for example, in the
chaff tray (4). When the four screws have been removed, carefully pull the front plate (8) off the Coffee
Roaster. Note that it is located on two small metal pins (11) on the front of the machine.
c. The drum (9) can now be taken out of the roasting chamber by pulling it straight out. You may need
to lift it slightly before pulling it out as its weight might jam it in the drive shaft once the front plate is
removed.
d. Clean out the chaff inside the roasting chamber (10) with a soft brush or cloth, or using a vacuum
cleaner, which can be convenient to remove all chaff and dust inside the roasting chamber
e. Some staining and discoloration is normal in the roasting chamber. For heavy build-ups of coffee oils
use a rag LIGHTLY MOISTENED in a coffee machine cleaning solution. Wipe the chamber thoroughly
with a rag or towel moistened with clean water to remove all traces of cleaning solution. Allow the
machine to dry completely before replacing the drum.
WARNING: DO NOT ALLOW WATER OR CLEANING SOLUTION TO DRIP INTO OR
FLOOD THE ROASTING CHAMBER! Water damage is not covered by the warranty.
f. Over time the drum (9) can become excessively caked with coffee oils. A light coating is good, but if it
smells burnt or rancid, or if the buildup is heavy it is time to clean it. The drum should be taken out of
the roaster for thorough cleaning. An espresso machine cleaner can be used or the removed drum can be
placed in the dishwasher. It is stainless steel and won’t rust. Dry the drum thoroughly before replacing
it in the Coffee Roaster. WARNING: NEVER immerse the entire machine in water and NEVER place
the entire machine in the dishwasher.
2- Replacing the drum (Refer to diagram on page 7)
a. Replace the drum (9) in the roasting chamber (10), being careful to align the drive pin on the drum’s
axle with the slot in the drive shaft. While keeping the drum parallel with the roasting chamber, push
the drum until it is fully seated.
b. Reposition the bearing plate (8). The flange on the edges of the Bearing Plate face outwards (towards
you). Make sure that the two pins (11) on the front of the Coffee Roaster are aligned with the two small