


Operation
3. Operation
3.1. Initial Setup
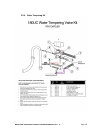
3.1.1. Dema Valve and Dema Flow Disc (New Models).
New Dema Valve made of stainless steel is more compatible with various water
conditions. Dema Flow Disc has been placed on the exit side of the water valve.
The Flow Disc reduces pressure to the standard recommended 20 PSI.
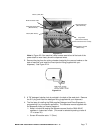
3.1.2. Rinse Pressure Regulator (Old Models Prior January 2008).
The CMA-180UC requires a supply water input pressure of 24 PSI minimum. This
pressure is then reduced by the supply water regulator. Use the following
procedure to adjust the rinse pressure to 20 PSI:
1. Close the door on the machine.
2. Turn the Power switch to the "ON" position.
3. While holding the “FILL” switch—to activate the water solenoid—adjust the
pressure regulator until the gauge reads 20 PSI. (Regulator is located
behind the front kick panel).
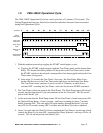
3.1.3. Rinse and Wash Temperatures
1. Turn the Power switch to the "ON" position.
2. After the machine has warmed up for about ten-minutes, note the wash and
rinse temperatures. The wash temperature must be 155°F minimum. The
rinse temperature must be 180°F minimum
3
. If necessary, adjust the
temperatures by removing the front kick panel and turning the thermostat
adjustment clockwise to increase, counterclockwise to decrease. This one
adjustment controls both temperatures.
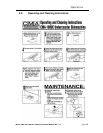
3.1.4. Post Instructions
1. Install wall chart and instruct machine operator on proper cleaning and
operation of the CMA-180UC.
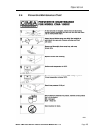
3.2. Startup Procedures
1. Open the door of the machine and check that the scrap screen is in place, and that
the spray arms and end plugs are secure.
2. Close the door of the machine and turn the Power switch to the "ON" position.
3. Hold the fill button about 25 seconds or until the water overflows into the scrap tray.
4. Once the water is filled to the proper level, press the rocker switch marked “START”
– the machine will automatically begin its cycle.
5. Check machine’s operating temperatures — Adjust if necessary. See section
3.1.3
Rinse and Wash Temperatures.
6. At the end of the wash period, drain the machine by pushing the rocker switch
marked “DRAIN”. Clean the wash tank screen and scrap tray screen. Remove and
clean the spray arms. (See wall chart instructions).
3
Rinse cycle temperature must be observed during a rinse cycle while the machine is in operation.
MODEL CMA-180UC INSTALLATION & OPERATION MANUAL Rev. 1.15 Page
11