


1. GENERAL
The appliance is designed to be mounted on a floor between two adjacent
cabinets. The cabinets should be securely fixed to the wall and the cooker
securely fixed to the cabinets.
This cooker must not be used free standing.
This appliance must not be installed over any other appliance that generates
heat such as a plinth heater.
The appliance can be installed under a worktop with or without a hob unit above.
It is important that the installation instructions for the hob are strictly observed.
Where a hob is fitted above the oven unit the electrical connection for the hob
should be made with an 85
0
C heat resisting flexible cord to table 15 of BS 6141.
A gas hob fitted above the appliance should be connected to the gas supply with
rigid tubing.
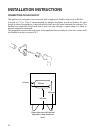
If a hob is to be installed directly above the appliance it must not project
downwards more than 20mm (30mm including a gas supply pipe where
applicable) below the underside of the worktop. Any projection of more than
10mm below the worktop must not project more than 500mm from the wall.
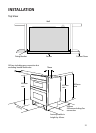
2. FINAL INSTALLATION
a. Ensure that the adjacent cabinets and the gap between them have
dimensions in accordance with the diagram.
b. Assemble the plastic plugs provided into the fixing brackets. (See diagram)
c. Fix the fixing brackets to the sides of the adjacent cabinets so that the centre
line of the brackets are 565mm above the top of the plinth line and the front
face of the plastic plug is level with the front face of the cabinet sides. (See
diagram)
d. Adjust the feet on the cooker to their minimum position, ie. fully screwed in.
e. Slide the cooker centrally into the space between the cabinets ensuring the
following:
i) The gap between the cabinet sides and the cooker is even along
the length of the cabinet sides.
ii) The cable is routed away from any vents in the rear panel and
is not trapped between the cooker and the wall, adjacent cabinets
or under the feet.
f. Adjust the feet using an open ended spanner until the bottom of the cooker
door is in line with the top of the plinth. Using a spirit level check that the
cooker is level in all directions.
g. Check that the plinth can be fitted. If necessary re-adjust the feet and check
that the cooker is level.
h. Open the top oven door and fix the cooker to the brackets through the holes
in the side trims.
i. Fix the plinth in position.
j. Ensure that there is a minimum gap of 1mm between the cooker side trim
and the adjacent cabinet doors or drawer fronts.
INSTALLATION INSTRUCTIONS
19