


7
OPERATING INSTRUCTIONS
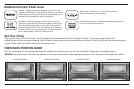
1. Place oven and appropriate accessories on a clean, dry,
flat surface. Make sure oven interior and accessories
have been cleaned and dried thoroughly before use.
2. Open the unit using the handle on the door, pulling it
downward until it rests comfortably in place.
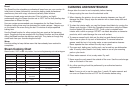
3. Before cooking, position the oven rack for the cooking
function being used. Refer to the Cooking Functions
Chart on page 5 and Oven Rack Position Guide on
page 6 for proper positioning.
4.
IMPORTANT WHEN COOKING WITH STEAM
Fill the water reservoir with tap water if using a function
requiring steam. Remove reservoir by lifting vertically,
using the integrated handle. Invert and remove reservoir
cap and fill. Replace cap and return reservoir so that it
is properly seated in its original position.
5. Place food in oven and close door.
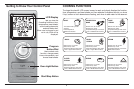
6. Turn the program dial to engage the functions menu.
NOTE: The program dial/button will be surrounded by
a blue LED light to indicate the functions menu is engaged.
7. Scroll until the proper cooking function appears on the screen. Refer to
the Cooking Functions chart on page 5 for function information.
8. Press the program button in the center of the dial to set
the function. A beep will sound and the temperature setting will start
flashing.
9. Use the program dial to select the desired temperature.
Refer to the Cooking Functions chart on page 5 for
temperature ranges.
10. Press the program button again in the center of the dial
to set temperature. A beep will sound and the default
time will begin flashing.
12. To increase or decrease cooking time, use the program
dial to scroll to appropriate time and then press the
program button again in the center of the dial to set the
time.
13. Press the START/CANCEL button to begin cooking cycle.
NOTE: A beep will sound and the START/CANCEL button
will be surrounded by a green LED light to indicate the cooking cycle
has begun. The countdown timer will begin counting down until cooking
cycle is complete.
For Use With TOAST Function:
1. Slide the crumb tray into position by tilting the crumb tray under the
bottom heating elements inside the unit, and pushing it to the rear wall.
NOTE: The crumb tray is properly positioned if it rests flat on the interior
base of the unit.
2.
All toasting is done with the oven rack in the middle rack position. Refer
to the Oven Rack Position Guide on page 5.
3. Turn the program dial to engage the functions menu.
NOTE: The program dial/button will be surrounded by a
blue LED light to indicate the functions menu is engaged.
4. Scroll until the TOAST function appears on screen, then
press the program button in the center of the dial to set
TOAST. A beep will sound and the toast shade selector
will start flashing.
5. Using the program dial, select a toast shade setting between 1 and 7
(1 is lightest, 7 is darkest).
6. Press the program button to set shade, which will appear in the display;
a beep will sound and the toast shade selector will no longer flash.
7. Press the START/CANCEL button to begin toasting cycle.
NOTE: A beep will sound and the START/CANCEL button will be
surrounded by a green LED light indicate the cooking cycle has begun.
Default countdown timer for the shade selected will now appear and
begin counting down.
1
2
4
9
13
1