


CY3270 PSoC® FirstTouch™ Guide, Document # 001-15945 Rev. ** 13
Getting Started
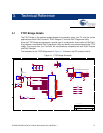
2.5 Exploring the FTMF Expansion Card Demonstration Projects
To explore the various FTMF Expansion Card projects, do as follows:
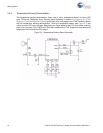
1. Remove the FTPC Bridge from the USB port on the PC.
2. Connect the FTMF Expansion Card into the header of the FTPC Bridge such that ‘Cypress Per-
form’ is visible on both the FTPC Bridge and the FTMF Expansion Card.
3. Once the two are properly connected, insert the complete FirstTouch Kit back into the USB port.
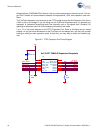
2.5.1 Opening a Demonstration Project
To run demonstration project, do as follows:
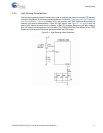
1. Launch the PSoC Express Development Suite. Once PSoC Express loads, the Express Design
Catalog panel is displayed in the Start Page pane.
2. From the Express Design Catalog, expand the ‘CY3270-PSoC FirstTouch Kit’ folder.
3. Click the CapSense Touch Sensing Slider entry. A design data sheet appears in the Express
Helper panel. This data sheet describes all of the details relating to this particular project.
Since this is a Design Catalog project, you cannot change this project directly. Instead, rename the
project and save it to a new location. This makes a copy of the project that you are free to change.
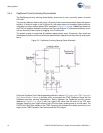
4. Double-click the MultiFunction Board CapSense Touch Sensing Slider entry. A dialog box
appears prompting you for a project name and location. Browse to the location where you want to
save this project, give it a name, and click OK.
PSoC Express ‘clones’ the contents of the MultiFunction Board CapSense Slider demonstration
project and the Project Design window appears.
Note Other documentation included with the PSoC Express Development Suite gives detailed
descriptions about the operation of PSoC Express.
2.5.2 Modifying the New Project
One example of modifying the demonstration project is as follows:
1. Place the cursor over the LED icon that appears on the Design window.
2. Right click and select Transfer Function.
3. From the Transfer Function window, select the Edit Transfer Logic radio button.
4. Click OK from the dialog box that appears.
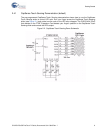
Once the Priority Encoder Transfer Function window appears, notice the details of how the
CapSense Slider affects the LEDs.
For this simple demonstration, you can change the order of the LEDs.
1. Left click in the LED_State_Blue area and delete the text in the ‘then’ field.
2. Right click to get menu options, then double-click on LED_State_Red from the list.
3. Left click in the original LED_State_Red area and delete the test in the 'then' field.
4. Right click to get the options, then double-click on LED_State_Blue from the list.
5. Click OK to continue.