


13
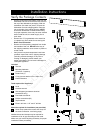
Installation Instructions
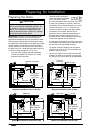
Attaching the Anti-tip
Brackets
CAUTION
Make sure to anchor one anti-tip bracket on each
side of the dishwasher.
1. The anti-tip brackets protect against possible
tipping caused by heavy bottom rack loads on
the door. Use only the stainless steel screws
provided with the machine.
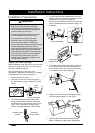
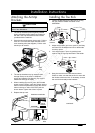
2. Open the door and remove the top rack. Pull the
rack out. Turn both rack stops outwards on the
rack mounting rails (see diagram). Pull the rack
toward you to remove.
3. The anti-tip brackets may be secured either
through the top or the sides. Installations
with a hard material (like granite) may require
attachment through the sides.
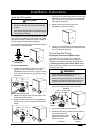
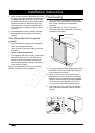
4. When installing the screws, place the included
spacer over the screw. Insert the screws into the
holes in the anti-tip brackets through the access
holes in the top or sides of the door jamb as
shown below. Tighten the screws in place.
5. Replace the top rack.
Installing the Toe Kick
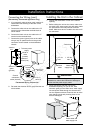
1. Loosen the brackets for the toe kick by moving
the gray catches toward the center of the
dishwasher.
2. Adjust the brackets (pull out or push in) until they
are flush with the kitchen toe kick on both sides
as shown below.
3. Lock the brackets in place by pushing both
catches into the appropriate notch in the holder.
4. Hang the toe kick on the brackets as shown.
Check to make sure that the toe kick is even with
the kitchen cabinet toe kick. If necessary, remove
the toe kick and readjust the brackets.
continued...
Access
hole
Spacer
Screw
Anti-tip
bracket
Attachment methods
or
Rack
stop
Toe kick
bracket
Catch