


12
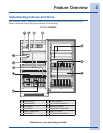
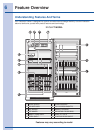
Ice Service
If your freezer has an automatic icemaker, it will
provide a sufficient supply of ice for normal use.
Duringtheinitialstartupofyourfreezer,however,
no ice will be produced during the first 24 hours of
operation.Automaticicemakersarealsooptional
accessories that may be installed in some models
at any time. Call your local dealer for information.
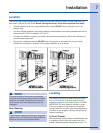
Turning Your Ice Maker On
Aftertheplumbingconnectionshavebeen
completed, the water supply valve must be
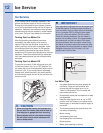
opened. Place the ice container under the ice
maker, pushing it as far back as possible. Lower
thewiresignalarmtoits“down”orONposition.
Newplumbingconnectionsmaycausetherst
production of ice cubes to be discolored or have an
odd flavor. These first cubes should be discarded
until the cubes produced are free of discoloration
and taste.
Turning Your Ice Maker Off
To stop the ice maker, lift the wire signal arm until
it clicks and locks in the “up” or OFF position. The
ice maker also turns off automatically when the ice
container is full. If your model has an adjustable
freezer shelf, place the shelf in the lower position,
so that the wire signal arm will hit the ice when the
container is full.
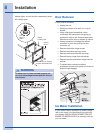
Ice
Container
1” or less
Leveling Bracket
IMPORTANT
Your ice maker is shipped with the wire signal arm
intheONposition.Toensureproperfunctionof
your ice maker, hook up water supply immediately
or turn ice maker OFF by lifting the wire signal
arm until it clicks and locks in the UP position.
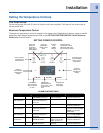
Check the leveling bracket on the ice maker to
ensure the ice maker is level. If the gap between
the freezer wall and the ice maker is the same
at top and bottom, then ice maker is level. If the
ice maker is not level, loosen the screw and slide
the bracket to the correct position to make it level.
Retighten the screw. You will need a 1/4 inch
socket wrench for this task.
Ice Service
Ice Maker Tips
• Icecubesstoredtoolongmaydevelopan
odd flavor. Empty the ice container and
ensure that the wire signal arm is in its
“down”orONposition.Theicemakerwill
then produce more ice.
• Occasionallyshaketheicecontainertokeep
ice separated.
• Keepthewiresignalarminits“up”orOFF
position until the freezer is connected to the
water supply or whenever the water supply is
turned off.
• Thefollowingsoundsarenormalwhenthe
ice maker is operating:
• Motorrunning
• Icelooseningfromtray
• Icedroppingintoicecontainer
• Runningwater
• Watervalveopeningorclosing
CAUTION
• When moving the freezer, pull straight out.
Do not shift the freezer from side to side as
this may tear or gouge the floor covering.
• Damp objects stick to cold metal surfaces.
Do not touch interior metal surfaces with
wet or damp hands.