


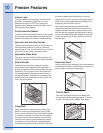

7
This Use & Care Guide provides general operating instructions for your model. Use the freezer only as
instructed in this Use & Care Guide. Before starting the freezer, follow these important first steps.
• Chooseaplacethatisnearagroundedelectricaloutlet.DO NOT use an extension cord or an
adapter plug.
• Formostefcientoperation,thefreezershouldbelocatedwheresurroundingtemperatureswillnot
dropbelow40°F (5°C)orexceed110°F (43°C).
• Foreaseofinstallation,properaircirculationandelectricalconnections,refertotheillustrationfor
recommended clearances.
• Fordynamiccondensermodels,DO NOT block the toe grille on the lower front of your freezer.
Sufficient air circulation is essential for the proper operation of your freezer.
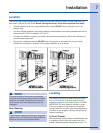
Door Opening
Installation
NOTE
If your freezer is placed with the door hinge side
against a wall, you may have to allow additional
space so the door can be opened wider.
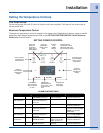
3 Air Space
3
3
3
Installation for 21 cu. ft.
without dynamic condenser
1Air Space
3/8
3/8
1
Installation for 17 cu. ft.
with dynamic condenser
1
NOTE
The exterior walls of the freezer may become
quite warm as the compressor works to transfer
heat from the inside. Temperatures as much as
30°F warmer than room temperatures can be
expected.
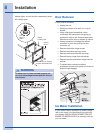
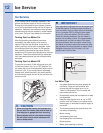
Location
Leveling
The freezer must have all bottom corners resting
firmly on a solid floor. The floor must be strong
enoughtosupportafullyloadedfreezer.ItisVERY
IMPORTANTforyourfreezertobelevelinorder
to function properly. If the freezer is not leveled
during installation, the door may be misaligned and
not close or seal properly, causing cooling, frost or
moisture problems.
To Level Freezer:
Afterdiscardingcratingscrewsandwoodbase,use
a carpenter’s level to level the freezer from front
toback.Adjusttheplasticlevelingfeetinfront,1/2