13
comes out (repeat this operation
as many times as necessary) and
then set the knob to the off
position (B-18).
· Meanwhile the water temperature
indicator lights up (B-26). It
indicates the water heating
process in the boiler. When the
light goes out it means that the
machine has reached the right
temperature and is ready for
coffee.
RESET OF STANDARD VALUES
· The coffee machine leaves the
factory set for the ideal Italian
espresso coffee, as approved by
the coffee University of Naples
and in accordance with ILLY
standard. The setting values for
long coffee, on the contrary, are
in accordance with German
standards.
· If you wish to reset these
standard values, just turn the
machine on by pushing the
ON/OFF button (B-20) and the
steam button (B-23) at the same
time. The flashing indicator lights
show that the standard values
have been reset.
REGULATION OF THE GROUND
COFFEE
· The coffee machine leaves the
factory already set on an ideal
coffee grinding level.
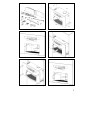
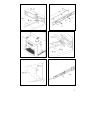
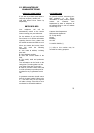
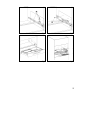
· Push the cabinet locking button
(E/1).
· Take the coffee machine out of
the housing using the special
telescopic runners (E/2).
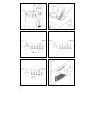
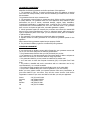
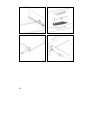
· The grinding level can be changed
using the special regulation knob
(A-10). By turning the knob in a
clockwise direction the grinding
becomes fine and the coffee
stronger. By turning the knob
anti-clockwise the grinding
becomes coarse and the coffee
lighter.
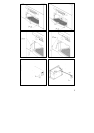
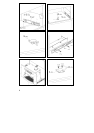
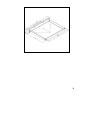
· Push the coffee machine back into
the housing (F/1), using the
special telescopic runners.
· Push the cabinet locking button
(F/2) again so that the machine is
secure.
PROGRAMMING OF THE GROUND
COFFEE MEASURE
· The coffee machine leaves the
factory already set to
dispense the ideal measure
for 1 cup of espresso.
· The ground coffee measure can
be increased or reduced and
once selected, the machine can be
programmed to remember this
measure. The ground measure
that can be programmed only
refers to one single cup of coffee.
Grinding time for double coffee
comes out automatically after
having memorised a single coffee.
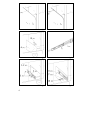
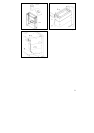
· Set the coffee measuring knob (B-
19) on the “small cup” light on the
left (B-31), insert the 1-cup-filter-
holder (A-11 / A-12) under the
special funnel (A-5) and gently
push and hold the grinder button
to make the grinder work (A-4).
After 10 seconds the grinder will
start working and it is possible to