


20
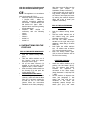
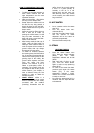
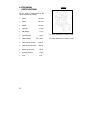
COMPONENTS FOR THE
INSTALLATION
The coffee machine is equipped with
the following components for the
installation (C):
1. 2 side-plates 1mm
2. 4 side-plates 2mm
3. 2 telescopic runners
4. 1 mains terminal block
5. 1 cabinet lock tongue
6. 1 cabinet locking bar
7. 2 L brackets
8. 2 rectangular washers
9. 1 mains power cable
10. 4 double stickers for fixing the
plates
11. 8 screws M4X16
12. 12 self-threading screws
13. 4 washers
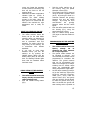
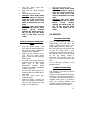
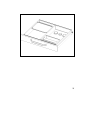
ELECTRICAL CONNECTION
· Fix the mains terminal block (C-
4) to the top back left corner of
the cabinet (O/1).
· Connect the mains cable to the
terminal block ensuring correct
polarity (C/4), and connect the
coiled mains input cable between
the appliance and the terminal
block.
USE OF THE SIDE PLATES
The width of the cabinet in which the
coffee machine should be inserted is
determined by the thickness of the
cabinet’s sides. To compensate the
different possible measurement, the
appliance is equipped with 6 plates, 4
are 2mm in thickness and 2 are 1mm.
thick. They should be used to
compensate the internal width of the
seat. For obtaining a width of
562/560mm see picture P/1 and P/2.
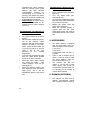
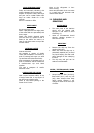
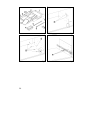
INSTALLATION WITHOUT
SUPPORT
· Put the suitable plates (P/1,P/2)
on the both sides of the housing,
fixing them with the double-
sticker strips (Q/1). Pay attention
to the position of the bevel which
indicates the right position of the
plates.
· Release the telescopic runners
and extract the front section (Q/2)
· Fix the telescopic runners’
bearings with the screws as
shown in picture Q/3
· Fix the 2 L brackets as shown in
picture Q/4
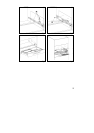
· Install the cabinet locking bar
using the rectangular washers and
the specific M4 screws as shown
in picture Q/5
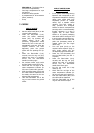
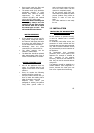
· Install the telescopic runners on
the both sides of the machine as
shown in picture Q/6
· Insert the machine: the telescopic
runners should be coupled with
the runners‘ bearings which are
already fastened on the sides.
(Q/7)
· Check the safety lock clicks when
the runners are pushed in.
· Adjust the cabinet locking bar if
necessary, for the correct locking
position of the machine, and
tighten the screws as shown in
picture Q/8
· Push the cabinet block button so
that the machine will be well
fastened (F/2).