


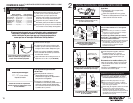
TROUBLESHOOTING
WHAT TO DO
Water and steam spits
forcefully from spout
without turning on the
dispenser faucet.
Water is not hot.
• Unit is boiling.
May be normal during initial setup.
• The unit is unplugged.
• The electric outlet is inoperative.
•
Activate faucet lever to release some water from
the tank.
• Adjust water temperature using dial on tank front.
Remember that at higher altitudes, water boils
at lower temperatures.
•
Make sure the unit is connected to a properly grounded
electric outlet.
• Make sure the circuit breaker or fuses are
functioning properly.
• Check that the outlet is not switched off.
Water is too hot
or not hot enough.
• Thermostat is not adjusted to
your needs.
•
Adjust the thermostat slowly, then activate faucet lever for 20
seconds to bring in fresh water to be heated at the new setting.
Allow 5-7 minutes for water to reach new temperature.
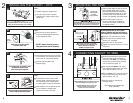
Water comes out the
vent instead of spout.
• Outlet tube is blocked. •
Check that outlet tube is not kinked, twisted or pinched.
•
Unscrew spout end piece and clean out any debris.
Water is dripping from
the spout/vent
intermittently.
• The expansion chamber isn’t
draining properly due to low
water pressure.
• The spout is blocked.
• Unplug the unit.If the dripping doesn’t stop after a few
minutes,check the supply valve to ensure that is fully
open and there are no obstructions in the water line
reducing the pressure below 30 psi (
i.e.,a poorly mounted
saddle valve,a clogged water filter,or a partially opened
shut-off valve).
•
Unscrew spout end piece and clean out any debris.
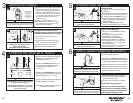
Water is dripping
from the spout/vent
constantly.
• Debris in the water line may be
in the faucet valve seat causing a
slow water leak.
•
Unscrew spout end piece and clean out any debris.
•
Activate faucet lever 7-10 times to flush faucet & lines.
Divided stream.
• Debris in the end piece. •
Unscrew spout end piece and clean out any debris.
Water continues to run
after releasing lever.
(View/Wave)
• Mounting nut too tight.
• Mounting washers not
installed properly
•
Loosen mounting nut,1/4 turn at a time, until shut-off occurs.
• See page 6, Step 2B to check proper mounting
washer installation.
PROBLEM POSSIBLE CAUSE
If you are still experiencing trouble call the AnswerLine
™
1-800-558-5700.
Please read Troubleshooting Guide and/or visit
www.insinkerator.com before calling AnswerLine
™
Water discoloration/rusty
appearance.
• Corrosion of unit. •
Unplug and drain unit as described in the Seasonal Storage/
Drainage Section on page 12 of this manual. If the water
discoloration remains after draining and refilling unit,
discontinue use and contact an authorized InSinkErator
service agent.
Electric Shock Hazard: To prevent electrical shock, disconnect power before
servicing unit. Use only a properly grounded and polarized electric outlet.
Scalding Hazard: Do not allow
water to boil. May result in
severe burns.
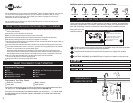
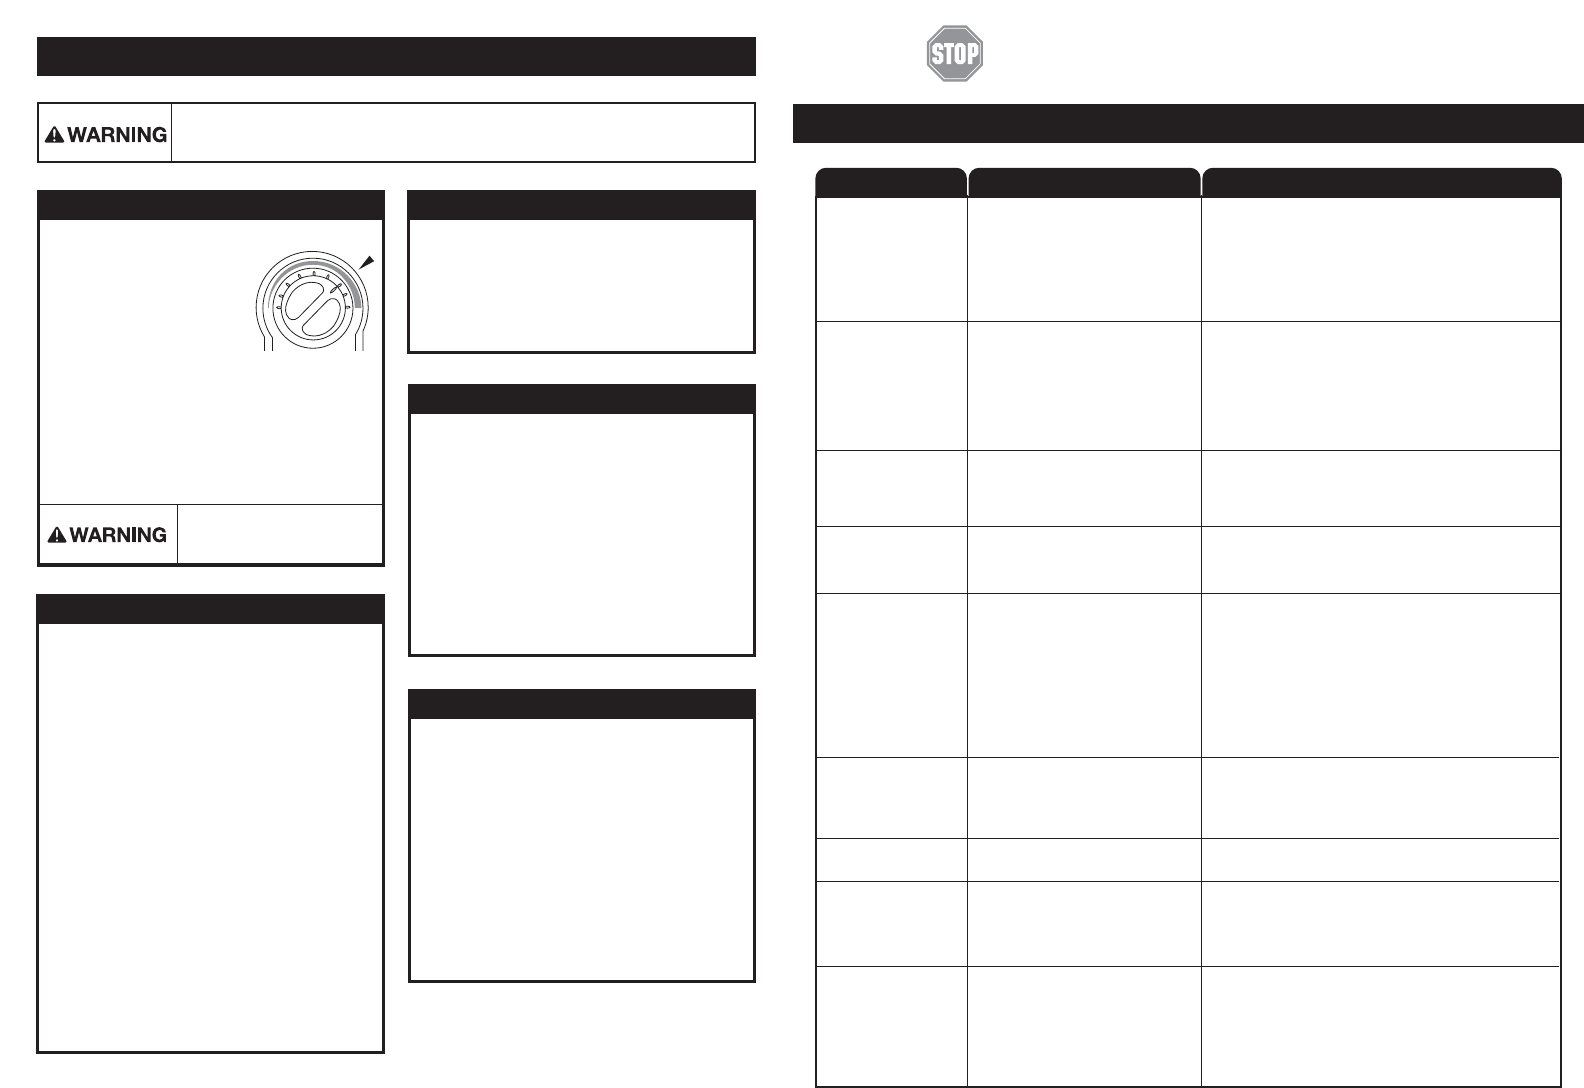
Factory temperature pre-set
is 200˚F. To reset the
thermostat to 200°, turn
the indicator two notches
to the right of vertical.
■■ Adjust the thermostat
slowly, turning the dial
clockwise to increase temperature
or counter clockwise to decrease
temperature, then activate faucet
handle for 20 seconds to bring in fresh
water to be heated at the new setting.
Allow 5-7 minutes for water to reach
new temperature.
■■ Regularly inspect the unit for any signs
of leakage. If there are signs of water
damage, immediately remove the unit
from service.
■■ To avoid water damage from leakage,
replace all cut, loose or split tubing.
■■ A drain pan, plumbed to an appropriate
drain or outfitted with a leak detector,
should be used in those applications
where any leakage could cause
property damage.
PROPERTY DAMAGE
CARE AND USE
approx. 200°
■■ Only use mild cleaners to clean the
faucet and plastic components.
■■ Cleaners with acids, abrasives,
alkaline or organic solvents will
result in deterioration of the plastic
components and void the warranty.
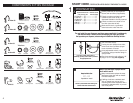
CLEANING THE FAUCET AND TANK
Anytime the instant hot water dispenser is not
used for extended periods of time, unplug and
drain unit. If it is below freezing you will need to
unplug the unit and drain it.
■■
Disconnect power from unit.
■■ Push hot water dispenser faucet lever
and allow water to flow until it is cool.
■■ Shut the cold water supply off at the valve.
■■ Locate and remove drain screw from
bottom center of water tank and drain
the water into empty pail.
■■ Empty the tank and then reinstall drain
screw into the bottom of tank, turning
until snug. Do NOT over tighten.
■■ If filter system installed, remove and
discard filter cartridge.
■■ To put back into working order, install
new filter cartridge (if required), fill tank
with water and reconnect the electrical
cord. (Refer to Page 10, Step 6)
SEASONAL STORAGE/DRAINAGE
ADJUSTING THE THERMOSTAT
For fresher tasting water, add filtration to
your instant hot water dispenser system.
InSinkErator offers the only water filtration
system designed specifically for instant
hot water dispensers. For more information,
visit www.insinkerator.com.
■■ Regularly check for signs of corrosion
by examining the appearance of the
dispensed water.
■■ If there is any discoloration or rusty
appearance, unplug and drain unit
as described in the Seasonal
Storage/Drainage section on this
page of the manual.
■■ If the water discoloration remains after
draining and refilling unit, discontinue
use and contact an authorized
InSinkErator service agent.
PERSONAL INJURY
12
13