


14
11
Using your oven for the rst time
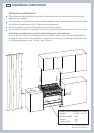
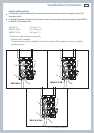
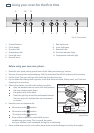
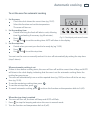
Fig. 14 Control panel
Before using your new oven, please:
1
Read this user guide, taking special note of the ‘Safety and warnings’ section.
2
Remove all accessories and packaging. Peel the protective film off all surfaces and accessories.
3
Set the clock. The oven will not work until the clock has been set.
4
If your model has sliding shelf supports, check that these are fitted. If they aren’t, see ‘Care and
cleaning’ for instructions.
5
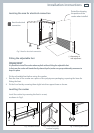
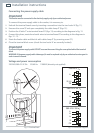
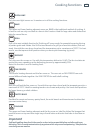
Slide in the shelves you will need, making sure that:
they are between the two wires of a shelf position;
the stop notches point down;
the guard rail is at the back.
Note: the grill tray should be positioned between
the two wires of a shelf position and orientated
as shown.
6
Heat the oven on maximum for:
60 minutes in the position
30 minutes in the position
15 minutes in the position
There will be a distinctive smell while you are
conditioning your oven. This is normal, but make
sure your kitchen is well ventilated during the conditioning.
7
Once cooled, wipe out the oven with a damp cloth and mild detergent, and dry thoroughly.
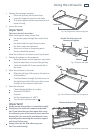
Fig. 15 Correct position of shelves
and grill tray
1
1
Control buttons
2
Clock display
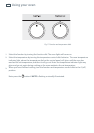
3
Function dial
4
Temperature dial
5
Front left zone
6
Rear left zone
7
Rear right zone
8
Front right zone
9
Rotisserie dial
10
Function indicator light
11
Temperature indicator light
2
34 5 67 8 9
10
Guard rail
Stop notch
Stop
notch
(NZ AU models only)