


19
for 3 minutes. Then the unit will restart and return to the ice-making mode.
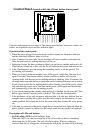
2. Ice Making (Green) LED: Ice Making indicator light
When this LED is on, the unit is working in the ice-making mode. When the green
LED is flashing, the unit is working in the ice-making mode but approaching the ice
harvest mode.
3. Ice Harvest (Yellow) LED: Ice Harvest indicator light
When this LED is on, the unit is working in the ice harvest mode controlled by the
ice-full probe.
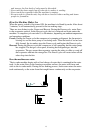
4. I. S. Adjust screw: Ice size adjustment
Turn the screw clockwise and the size of individual ice cubes will be larger in the next
cycle; the cycle time will be longer. Turn the screw counter-clockwise, and the ice
cube size will be smaller in the next cycle.
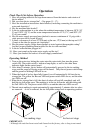
5. Power switch
This is the main switch. When it is turned on, the unit goes into Stand-by mode for
about 3 minutes, with all LEDs on, then starts to make ice cubes automatically,
switching between ice-making and ice harvest modes.
6. CLEAN button
While the unit is in Stand-by mode (all LEDs on steady), you can press CLEAN to
start the Automatic Clean procedure. The green and yellow LEDs will flash together.
NOTE: When you finish working with the control panel, close the cover.
IMPORTANT:
? It is recommended that the ice cube size not be adjusted more often than necessary
since this could damage the machine’s controls.
? Avoid letting water contact the control box.
? When you finish working with the control panel, close the cover.