


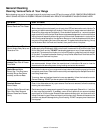


General 17 information
General Cleaning (continued)
Cleaning the Self-Clean Oven (some models) (continued)
Preparing the Oven for Self-Cleaning
1. Remove an excess spillovers in the oven cavity before starting the self-cleaning
cycle. To clean, use hot soapy water and a cloth. Large spillovers can cause heavy
smoke or fire when subjected to high temperatures. DO NOT allow food spills with
a high sugar or acid content (such as tomatoes, sauerkraut, fruit juices or pie filling)
to remain on the surface as they may cause a dull spot even after cleaning.
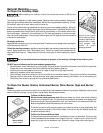
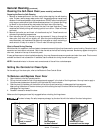
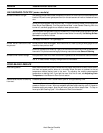
2. Clean any soil from the oven frame and the door liner (see illustration). These
areas heat sufficiently during self-cleaning cycle to burn soil on. Clean with soap
and water.
3. Remove the broiler pan and insert, all utensils and any foil. These items do not
withstand high cleaning temperatures
4. Oven racks may be left in the oven or may be removed. If they go through the
clean cycle, their color will turn slightly dull. After the cycle is completed and the
oven has cooled, rub the sides of the racks with wax paper or a cloth containing a
small amount of baby oil or salad oil. This will make the racks glide easier.
What to Expect During Cleaning
While the oven is in operation, the oven heats to temperatures much higher than those used in normal cooking. Sounds of metal
expansion and contraction are normal. Odor is also normal as the food soil is being removed. Smoke may appear through the
oven vent, located on the top of the control panel.
If heavy spillovers are not wiped up before cleaning, they may flame and cause more smoke and odor than usual. This is normal
and safe and should not cause alarm. If available, use an exhaust fan during the self-cleaning cycle.
NOTE: A smoke eliminator in the oven vent converts most of the soil into a colorless vapor.
Setting the Controls for Clean Cycle
For the setting of the clean cycle, refer to the Electronic Oven Control Guide.
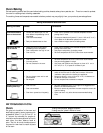
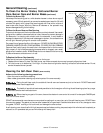
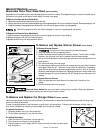
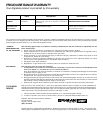
To Remove and Replace Oven Door
1. Open the door to the fully opened position.
2. Pull up the lock located on both hinge supports and engage it in the hook of the hinge levers. You may have to apply a
little downward pressure on the door to pull the locks fully over the hooks.
3. Grab the door by the sides, pull the bottom of the door up and toward you to disengage the hinge supports.
Keep pulling the bottom of the door toward you while rotating the top of the door toward the range to completely
disengage the hinge levers.
4. Proceed in reverse to reinstall the door.
Make sure the hinge supports are fully engaged before unlocking the hinge levers.
The door is heavy. For safe, temporary storage, lay the door flat with the inside of the door facing down.
Lock in normal
position
Lock engaged
for door removal
HINGE SLOT Door
removed from the range
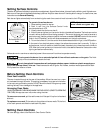
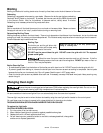
DO NOT HAND
CLEAN SEAL
DO HAND
CLEAN
FRAME
DO HAND
CLEAN DOOR