


TB14 SERIES GAS FRYERS
CHAPTER 6: COMPUTER OPERATION
6–4
6.1.1 Equipment Setup and Shutdown Procedures (cont.)
5. At this time, the hold time will be displayed (if programmed greater than 0) and countdown
will begin. When the hold time counter reaches 0, an alarm will sound.
and the
product number selected is displayed. The hold alarm is canceled by pushing the
switch.
If display is in use, hold time will count down invisibly until display is free.
6.1.2 Checking Temperature
A. Check the cooking oil/shortening temperature at any time by pressing the switch once.
Check the setpoint by pressing the switch twice.
B. During the idle periods, when the fryer is on but not in use, " " should appear on both
displays on a single frypot computer. " " will appear on the display of the side that is
turned on in a split-vat computer. If not, check actual temperature and setpoint.
C. If you suspect a defective probe, check the cooking oil/shortening temperature with a
thermometer. Insert the thermometer within 1-inch of the vessel-mounted probe. Verify that the
computer readout is within ±5°F (±2°C) of the thermometer reading.
NOTE: The electronic circuitry can be affected adversely by current fluctuations and electrical
storms. If for no apparent reason the computer does not function or program properly, reset the
computer by unplugging the power cord and plugging it back in.
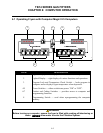
6.2 Programming the Computer Magic III.5 Computer
1. Activate the computer by pressing either switch.
2. To enter the program mode, first press the
switch. will appear in the left display. If
you have pressed this switch in error and do not wish to program, press the switch again.
Note: The computer will flash
if cooking is in progress.
3. Press
(1 6 5 0) in that sequence to enter the program mode.
4.
(Setpoint) will appear in the left display. This is for setting the cooking temperature. The
temperature previously selected will be displayed in the right display. Enter new temperature.
Press the switch to lock in temperature setting. If the setting is correct, press the switch to
cancel the selection.
5. (Select Product) will appear in the left display. Press the product button to be
programmed.
6. will appear in the left display. The sensitivity number previously selected will be
displayed in the right display. Enter the new desired sensitivity number, the range is 1 to 9.
Enter "0" for no sensitivity. Press the
switch to lock in the setting.