


ENGLISH
Coffee preparation
1 Follow the procedure described under “Pre-
paration”.
2 Select the correct filter basket (10 or 11) and
insert it in the filter holder (9).
• 11 •
Every user will be free to program the doses
to obtain a more or less strong coffee and
to assign bigger or smaller doses to buttons
(2 and 3) to use 1 or 2 cup filter.
6 After storing these doses, press “MENU” key
(6) again to exit from the programming fun-
ction.
The symbols placed under the buttons
will re-start lighting up alternatively.
The appliance is now ready to dispense
excellent coffees.
N.B.: to brew 1 coffee press button (2 or 3)
once; to brew 2 coffees press button (2 or
3) twice.
Use the small filter for 1 cup and the large
filter for 2 cups of espresso.
Then insert filter-holder (9) into the appliance
and wait at least 10 minutes.
3 After the warm-up period, remove the warm
filter-holder (9) from the brewing head and
fill with correctly ground espresso coffee
using the measuring spoon provided.
Place one level measure of coffee in basket
for each cup of espresso. Do not overfill.
Gently tamp down coffee with the tamper
(18) provided. Do not compress too firmly.
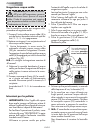
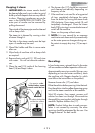
4 Clean any excess coffee from the rim of
filter holder (9). Insert filter holder into brew
head by holding handle approximately 45
degrees to the left as you face machine.
When properly aligned,move handle firmly
to the right to lock into position.
The handle should point to the front of the
machine or slightly to the right.
5 Place one or two espresso cups on the drip plate
to line up with the spouts of the filter holder. Press
the button corresponding to the stored coffee
dose. Espresso will start to flow into cups.
6 The coffee dispensing will automatically stop
when the preset level is reached (see Coffee
dose programming);however it is possi-
ble to stop the coffee dispensing by pressing
the button (2 or 3) as previously selected.
When properly made, the espresso will have a
light brown foam “crema” floating on the top.
If not, refer to “In the event of faulty
function”.
7 Remove cups and serve.
8 To make more espresso, carefully and slowly
remove the filter holder by moving handle to
the left. Be careful as hot water will be on top
of the coffee grinds in the holder. Some wa-
ter will continue to drip from brewing head
as filter holder is removed. That is normal
and due to the pump pressure in the system.
Knock out used coffee grinds from filter. For
more espresso repeat steps 2 to 7 above.
9 To prepare coffee manually, carry out steps 2
through 5 and then press button 6. When you
have obtained the desired quantity of coffee
in the cup, press button 6 again to stop the
cycle. Then proceed with steps 6 and 7.
N.B.: Dispensing should not exceed 40
seconds.
Pre-Infusion
The machine allows you to adjust the dosage
settings so that the water produced for the COF-
FEE dose is preceded by a pre-infusion step.
Press the dose button (2) and the normal coffee
cycle is preceded by a brief, timed jet of water
that moistens the coffee wafer before the actual
coffee making cycle starts.
This function allows you to get the most flavor
out of the coffee wafer.
PRE-INFUSION is not available on the dose
button (3).
N.B.: the machine comes from the factory with
PRE-INFUSION function set to ON. Should
you choose to deactivate this function you
will need to enter the programming mode
(see “Coffee dose programming”)
and press the hot water supply button (4).
The indicator light on the button will turn off.
The indicator light on the hot water supply
button (4) is ON when the PRE-INFUSION
function is ON. Vice versa, if the indicator
light is OFF, then the PRE-INFUSION function
is OFF.