Part # 4520898 (03/31/11)Page 14
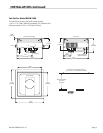
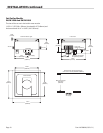
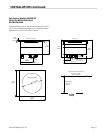
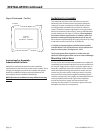
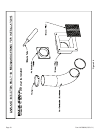
Figure Continued - Cut Out
CUTOUT
9.125" x 7"
[231.8mm x 177.8mm]
4 HOLES
Instructions For Assembly:
Induction Built-In Units
Garland has made enhancements for the installation
requirements for the induction cooker built-in models. These
changes are designed to provide the installer with greater
details for installation. Meeting these requirements will
reduce failure due to installation deciencies
NOTE: BI Units not installed correctly will have warranty
Voided.
Guidelines For Assembly
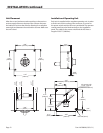
The underside and sides of the induction unit must be
absolutely clear of obstructions to provide for adequate
cooling air to enter and exhaust. Install a exible air duct
including shackle provided with your built-in induction
cooker. Clearances between openings for air supply and air
exhaust to obstacles (walls or oors), must be maintained to
provide clearances of at least 4” (102mm). The outgoing air
must leave without any obstacles. In addition, make sure
that the in-coming and outgoing exhaust air do not mix.
We recommend guaranteeing the supply of fresh air by using
a tube with screens, vent ducts or Air Intake Kit.
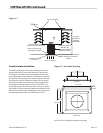
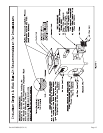
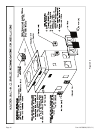
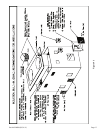
It is highly recommend that an exhaust fan be installed
into the cabinet. This will force hot air out the cabinet and
away from the cooker. (See gures # 3, 4 & 5)
The fat and grease lter should be in visible view and
labeled. A blocked grease lter can cause internal damage!
Mounting Instructions
As soon as the above mentioned preparations are made, the
completely pre-mounted induction unit can be installed into
the counter. Apply silicone, which is provided with every air
Intake Kit, completely around the underside of this stainless
steel frame before lowering the induction cooker onto the
counter top. Once the built-in induction cooker is in place,
food save silicone may be also applied completely around
stainless steel top trim, this is highly recommended. Silicone
properly installed, will provide a good seal completely
around the induction cooker and stop moisture from
entering into the cooker. This moisture or grease will cause
damage to the electronic components.
INSTALLATION continued


