


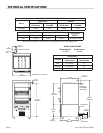


Part # 4517385 (02/20/08) Page 7
Electrical Connection
IMPORTANT – This appliance must be electrically grounded
in accordance with local codes.
Testing & Adjustment
All ttings and pipe connections must be tested for
leaks. Use approved gas leak detectors, soap solution or
equivalent, checking over and around all the ttings and
pipe connections. DO NOT USE A FLAME! Accessibility to
all gas lines and ttings require that valve panel(s), lower
front panel(s), and/or oven rack(s) be removed. All parts
removed, (including fasteners), should be stored safely for
re-installation.
1. Be sure that all valves are in the “OFF” position.
2. Turn on the main gas supply valve. Light all broiler pilots.
3. Leak test all valves and ttings as described at the
beginning of this section. Correct any leaks as required
and recheck.
4. Light the oven pilot.
All units are tested and adjusted at the factory, however,
burners and pilots should be checked upon installation and
adjusted if necessary.
CAUTION: Gas will ow to the top section burners even
if the broiler section pilots are not lit. Gas will not be
interrupted. It is the responsibility of the operator to
conrm the proper ignition of each burner as it is turned
on. Should ignition fail to occur 5 seconds after turning
a burner on, turn the burner o, wait 5 minutes, and try
again.
OPERATION
Infra-Red Burners
The GARLAND® Infra-Red Broiler is a direct radiant heavy
duty gas broiler utilizing four (4) extremely ecient gas
burners in each broiling section. The infra-red burners
provide for high speed broiling with rapid searing of product
so that natural juices and avor will be sealed in.
These special burners operate in a manner similar to that
of a conventional gas burner except that the radiation
surfaces consist of a series of ceramic blocks each containing
numerous small gas ports. These ceramic blocks are
connected utilizing a special compound that also seals all
seams of the radiating surface. The gas ame appears as a
red glow covering the entire ceramic surface.
A special wire mesh has been provided as an outside
surface beneath the ceramics to further increase the burner
eciency. This mesh will provide for additional infra-red
energy.
Initial Operation: Infra-Red Burners
1. Connect electrical supply.
2. Open gas service valve located in your supply line.
3. With a lighted taper, light the broiler pilots located at the
front of the unit. There is one pilot per pair of burners.
4. Pilot adjustment valves can be found on the manifold,
behind the control panel. The valves may be accessed
through holes in the control panel.
5. The pilots should be adjusted so that ame extends 1/2”
to 3/4” (12mm to 25mm) beyond the pilot shield.
Operation: Infra-Red Burners
1. Switch on (1) the main power switch.
2. Turn the broiler valve to HIGH.
INSTALLATION continued