


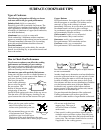

Automatic Oven Shut Off Oven Light
As a safety feature, this oven will automatically shut
itself off if it has been left on for more than 12 hours.
Use the switch on the control panel to turn the light on
and off.
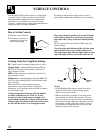
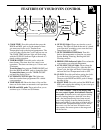
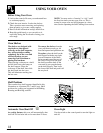
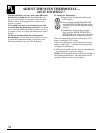
Shelf Positions
The oven has four shelf supports identified in this
illustration as A (bottom), B, C and D (top). Shelf
positions for cooking are suggested in the Baking,
Roasting and Broiling sections.
A
B
C
D
USING YOUR OVEN
Before Using Your Oven
1. Look at the controls. Be sure you understand how
to set them properly.
2. Check the oven interior. Look at the shelves.
Take a practice run at removing and replacing
them properly to give sure, sturdy support.
3. Read over the information and tips that follow.
4. Keep this guide handy so you can refer to it,
especially during the first weeks of using your
new range.
NOTE: You may notice a “burning” or “oily” smell
the first few times you turn your oven on. This is
normal in a new oven and will disappear in a short
time. See the Operating the Self-Cleaning Oven section.
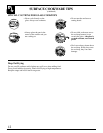
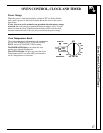
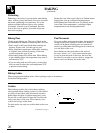
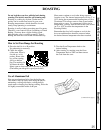
Oven Shelves
The shelves are designed with
stop-locks so when placed
correctly on the shelf supports,
they will stop before coming
completely out of the oven and
will not tilt when you are
removing food from them or
placing food on them.
When placing cookware on a shelf,
pull the shelf out to the bump on
the shelf support. Place the
cookware on the shelf, then slide
the shelf back into the oven.
This will eliminate reaching into
the hot oven.
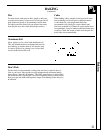
To remove the shelves from the
oven, pull them toward you, tilt
front end upward and pull them out.
To replace, place the shelf on the
shelf support with the stop-locks
(curved extension of the shelf)
facing up and toward the rear of
the oven. Tilt up front and push
the shelf toward the back of the
oven until it goes past the bump
on the shelf support. Then lower
the front of the shelf and push it all
the way back.
Bump
18