


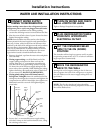

Installation Instructions
WATER VALVE INSTALLATION INSTRUCTIONS
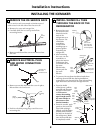
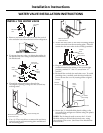
• Attach the water valve to the lower rail using the hex
screws removed from the mounting plate. This will
assure that the water valve is electrically grounded.
• Plug the water valve wire connector into the
terminal board at the points on the bottom right
position, marked “1” and “2” across from “A”
and “B.”
• Re-install the vertical wire and tube cover. To avoid
pinching wires, carefully tuck the wires inside the
cover. Secure the cover by reusing all the original
screws.
• Secure the 1/4 inch flexible plastic tubing to the
rear wall of the refrigerator cabinet using the plastic
stick-on clamp.
NOTE: The P-clamp is used to secure the 1/4 inch
flexible tubing at the back horizontal cover, using
the existing cover screw. (See Water Line Installation
Instructions.)
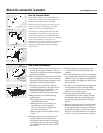
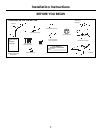
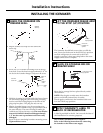
INSTALL THE WATER VALVE
• Remove and save the 4 hex screws and the vertical
wire and tube cover from the back of the refrigerator.
• To access the water valve, cut along the outline in
the fiberboard cover using a utility knife. Remove
the fiberboard.
• Thread the water valve wires through the
rectangular opening, taking care not to bend any
existing tubes.
• Use a 1/4″ hex nut driver to remove the two lower
screws from the valve mounting plate and discard
the mounting plate.
Wire and tube
cover
1/4″ plastic
tubing
1/4″
plastic
tubing
Water
valve wires
Water valve
wire connector
Water
valve
Wire and
tube cover
Plastic
stick-on
clamp
1/4″ flexible
plastic tubing
Water valve
Terminal
board
Water valve
wire connector
Reuse hex screws to
mount water valve
Discard mounting plate
Remove hex screws and reuse
to mount water valve
10