


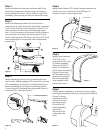


Step 1
Remove the bottom three bins and lower shelf in the
fresh food compartment. Remove any ice inside the
fresh food side of the unit. Check under the quick chill
assembly. Clean and dry the area, as well as the sump.
Step 2
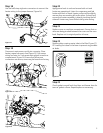
Remove the beverage center duct cover and the
evaporator line cover. Remove the fresh food evaporator
cover via the three (3) screws attaching it (Figure 1). Tilt
the assembly out of the way of the beverage center
duct. It is not necessary to disconnect the fans. Remove
any ice present and dry the area thoroughly. Should
Fresh Food Evaporator EPS Block or Air Return EPS Block
become damaged in this process, utilize replacement
pieces in kit.
Figure 1
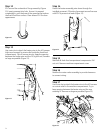
Step 3
Remove Beverage Center Duct and replace with new
duct from kit, liberally applying RTV to seal Duct in place.
RTV completely around the Duct including behind and
below, smoothing on with finger is preferred method.
Cover as much of the gasket area as possible (Figure 2).
Install the EPS L-insert per Figure 2.
Figure 2
Step 4
Apply a liberal bead of RTV along the space between the
custom cool cover and the left sidewall (Figure 3).
Smooth to ensure a clean appearance.
Figure 3
Step 5
Apply a liberal amount
of RTV102 to the
underside of the 3-watt
AC heater assembly.
Follow the INSIDE of
the lip on the bottom
of the heater assembly
(Figure 4). Ensure the
RTV will make contact
around the entirety of
the heater assembly
when applied to the
custom cool cover.
Figure 4
Step 6
Position heater assembly on custom cool cover, making
sure heater assembly is directly touching the left sidewall
(Figure 5). Heater
assembly should fit
custom cool cover
geometry snugly.
Ensure that the
heater assembly
goes all the
way back to the
evaporator tube
cover.
Figure 5
C
O
L
D
ES
T
C
O
L
D
DELIFRESH
EPS L Insert
2