


11
INSTALLATION INSTRUCTIONS
• Installation of this cooktop must conform with
local codes, or in the absence of local codes, with
the National Fuel Gas Code. ANSI Z223.1–Latest
Edition.
• Disconnect electrical supply before servicing.
• Make sure the wall coverings around the
cooktop can withstand heat generated by the
cooktop up to 200°F.
• Avoid placing cabinets above the cooktop. To
reduce the hazard caused by reaching over the
open flames of operating burners, install a
ventilation hood over the cooktop that projects
forward at least 5″ beyond the front of the
cabinets.
• If cabinets are placed above the cooktop, allow
a minimum clearance of 30″ between the cooking
surface and the bottom of unprotected cabinets.
• If a 30″ clearance between cooking surface and
overhead combustible material or metal cabinets
cannot be maintained, protect the underside of
the cabinets above the cooktop with not less than
1/4″ insulating millboard covered with sheet
metal not less than 0.0122″ thick.
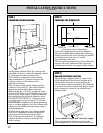
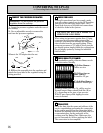
• Clearance between the cooking surface and
protected cabinets MUST NEVER BE LESS
THAN 24″. The vertical distance from the plane
of the cooking surface to the bottom of adjacent
overhead cabinets extending closer than 1″ to
the plane of the cooktop sides must not be less
than 18″. (See Dimensions and Clearances
illustration in this section.)
IMPORTANT SAFETY INSTRUCTIONS
The cooktop has been design certified by
the American Gas Association. As with any
appliance using gas and generating heat, there
are certain safety precautions you should follow.
You’ll find these precautions in this Use and Care
Guide; read it carefully.
• Be sure your cooktop is installed properly
by a qualified installer or service technician.
• The cooktop must be electrically grounded
in accordance with local codes, or in their
absence, with the National Electrical Code
ANSI/NFPA No. 70–Latest Edition.
FOR YOUR SAFETY
IF YOU SMELL GAS:
1. Open windows.
2. Don’t touch any electrical switches.
3. Extinguish any open flame.
4. Immediately call your gas supplier.
FOR YOUR SAFETY
Do not store or use gasoline or other
flammable vapors and liquids in the vicinity of
this or any other appliance.
(continued next page)
BEFORE YOU BEGIN
Read these instructions completely and
carefully.
IMPORTANT–OBSERVE ALL GOVERNING
CODES AND ORDINANCES.
NOTE TO INSTALLER: Be sure to leave
these instructions with the consumer.
TOOLS AND PARTS NEEDED
• Large flat blade screwdriver
• Saw
• Carpenter’s square
• Pipe wrench
• Gas line shut-off valve
• Pipe joint sealant that resists action of LP gas
For flexible connection where local
codes permit:
• Flexible metal tubing (same 3/4″ or 1/2″ I.D.
as gas supply line)
• Flare union adapter for connection to supply line
(3/4″ NPT x 3/4″ I.D. or 1/2″ NPT x 1/2″ I.D.)
• Flare union adapter for connection to regulator
(1/2″ NPT x 3/4″ I.D. or 1/2″ I.D.)
For rigid connection:
• Pipe fittings as required
PARTS LIST
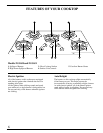
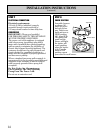
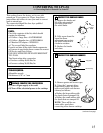
Cooktop
• 5 burner grates
• 5 burner caps
• Pressure regulator with attached 1/2″ to 3/8″
reducing bushing and 3/8″ pipe nipple
• 2 clamping brackets with screws
• Attached 120 volt grounded plug cord
• Self adhesive gasket