


Installation Preparation
5
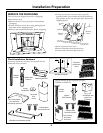
Check Installation Hardware
Locate the hardware accessory box packed with the
hood and check contents.
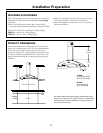
REMOVE THE PACKAGING
The vent hood is shipped secured to a shipping
board with 4 screws.
• Remove the duct cover, parts box and styrofoam
packaging.
• Lift the hood out of the box, using hand grips on
both sides of the shipping board.
• Remove and properly discard the plastic wrapping.
• Locate and remove 2 screws at the top of the
assembly and 2 screws inside the hood behind the
filter guides on the left and right sides. Discard the
shipping board.
• Remove junction box cover.
• Remove knockout from junction box.
• Install strain relief onto junction box.
Check contents of the required accessory,
ZXR758 or ZXR7510.
Mounting Screw
Shipping Board
2 Large
Flat Washers
2 Phillips Head
Decorative Screws
3 Stainless
Steel Grease
Filters
10 Wood
Screws
2 Side Bars with 4 Machine Screws
Wall Mount Template
2 Mounting Brackets
Duct Cover Bracket
(not required for
recirculating operation)
10 Metal Wall
Fasteners
Decorative
Duct
Covers
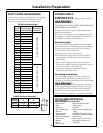
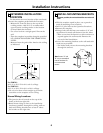
• Drill 1/8" Pilot Holes For Mounting Brackets.
Align edge 25-1/2" above Cooking Surface.
17-5/16"
3-15/16"
13-9/16"
2-5/32"
C
L
C
L
C
L
• Drill 1/8" Pilot Holes.
• Drill 1/8" Pilot Holes.
26-14" to 8 ft. Ceiling
38-1/4" to 9 ft. Ceiling
38-1/4" to 50-1/4" For
9ft. to 10 ft. Ceiling
Using Optional Accessory
ZX10SY Duct Cover
5-7/8"
2 Wood
Screws
2 Plastic
Wall Fasteners
Air Deflector with
Upper Duct
Connector
Recirculating
Decorative
Duct Cover
Mounting
Screw
Shipping Board
Mounting
Screw
Knockout
Junction
Box
3 Charcoal Filters
2 Phillips Head
Decorative Screws