


Page 14 Grind’n Brew® Coffee Systems
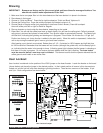
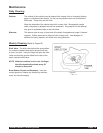
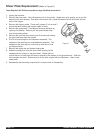
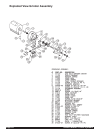
Shear Plate Replacement (Refer to Figure E)
Tools Required: #2 Phillips screwdriver, large flat blade screwdriver
1. Unplug the machine.
2. Remove the front panel. Shut off the bean flow to the grinder. Single bean units require you to pull the
bean shut-off valve forward. Dual bean units require you to push the bean shut-off valve back into the
slots in the hopper.
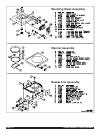
3. Remove the hopper cradle. There are 5 screws (2 in front and 3
across the back) holding the hopper cradle in place.
4. Remove the spray head. First remove the spray deflector by
spinning it clockwise. Second, pull the spray nozzle away
from the mounting sheet.
5. Remove the grind cap by loosening the 2 screws and rotating
the grind cap away from the screws.
6. Pull out the revolving burr and feedworm assembly. The
sweeps on the revolving burr and feedworm assembly. The
sweeps on the revolving burr must line up with the cut outs
on the grind head.
7. Remove the shear cap and broken shear plate.
8. Slide the rotating burr onto the motor shaft, aligning up the
sweeps with the cutouts on the grind head. Rotate the burr
so that the burr is held back into the burr pocket by the sweeps on the grind head lip. Slide the
drive coupler into place. Rotate the slot on the drive coupler with the feedworm. Insert a new
shear plate.
9. Reassemble the remaining components in reverse order of disassembly.
.
Figure E