


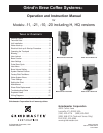


Page 6 Grind’n Brew® Coffee Systems
Electrical Hook-up and Start-up Procedure (All Models)
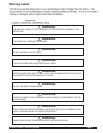
IMPORTANT: Do not plug the unit in yet.
IMPORTANT: This equipment must be installed in compliance with applicable Federal, State and/or
Local electrical codes having jurisdiction. Do not use extension cords. Make sure that
the outlet the brewer plugs into is grounded.
IMPORTANT: Make sure that the Main Power Switch in the back of the unit is in the Off position before
plugging in the brewer.
IMPORTANT: Domestic Q models at 208/230V must have a 4 wire electrical connection. The circuit must
have 2 hots, 1 ground and 1 neutral wire. Failure to install with a 4 wire connection will void
the manufacturer’s warranty. 208/230 Volt Grind’n Brew units require a 20 Amp circuit.
1. Plug the brewer into an electrical outlet (or run power to unit for hardwire applications).
2. Make sure the brew basket is inserted in the brew rails.
3. Reach to the back of the brewer and press the white Main Power Switch to the On position. The front control lights
will go on, and water will enter the brewer. The tank will fill in 2-3 minutes from the moment the Main Power Switch is
turned on.
4. Once the tank is full, it will take 10-15 minutes to heat the water to the brewing temperature. (Cut that time in half for
the 230V “Q” models.) Once the Ready light is lit, you are ready to brew.
IMPORTANT: Brewers are factory set for throw weight and water portion. Please check that installation
is correct before making adjustment. No adjustments should be necessary for normal
installation.
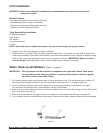
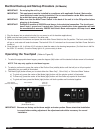
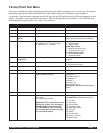
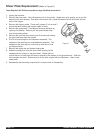
Operating the Touchpad (Refer to Figure B)
1. To select the appropriate bean hopper, press the hopper (left) button until the desired indicator arrow is illuminated.
NOTE: This step only applies to dual bean hoppers.
2. To select a portion size, press the center of the Portion Size (middle) button until the half pot or full pot symbol
(depending on your need) is illuminated.
3. The Mode (right) button allows you to select either the “Brew Only”, “Grind Only” or “Grind and Brew” feature.
a) To grind only, press the center of the Mode (right) button until the grinder symbol is illuminated.
b) To brew only, press the center of the Mode (right) button until the coffee cup symbol is illuminated.
c) To grind and brew, press the Mode (right) button until both symbols are illuminated together.
Figure B
(Dual Bean Model)
(Single Bean Model)
Half or Full PotBean Selector
(Dual Bean Models Only)
Grind only
Brew only
Grind and Brew Option