


-10-
H8067 Flat Iron Style Mandolin Kit
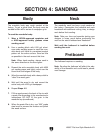
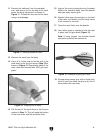
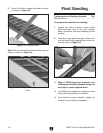
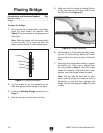
Figure 15. Trimming brad nails.
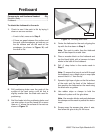
4. Center the fretboard on the neck, aligning the
top with the line drawn in Step 2
.
Note: The neck is wider than the fretboard
and will be shaped to match later.
5. Place a wooden block on the fretboard and
tap the block lightly with a hammer to leave
marks in the back of the fretboard.
6. Drill
1
⁄8" deep holes in the marks made in
Step 5
.
Note: To ensure that you do not drill through
the fretboard, use a depth stop or wrap tape
around the bit
1
⁄8" from the tip.
7. Spread a light layer of glue on the flat surface
of the neck and the back of the fretboard,
then position the fretboard on the neck using
the brad nails as guides.
8. Use rubber strips or clamps to hold the
fretboard in place until the glue dries.
Note: Use wooden blocks and pads between
the clamps and the neck to protect the instru
-
ment.
9. Scrape away the excess glue when it sets,
then allow the glue to dry for 24 hours.
2. Drill positioning holes near the ends of the
surface of the neck using a drill bit that is
slightly smaller than the brad nails used for
positioning.
3. Nail the brads into the positioning holes and
use wire cutters to cut the heads off no more
than an
1
⁄8" above the surface of the neck as
shown in Figure
15.
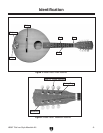
Components and Hardware Needed: Qty
Mandolin Body ...................................................
1
Fretboard ...........................................................
1
To attach the fretboard to the neck:
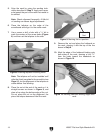
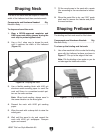
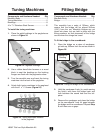
1. Check to see if the neck is flat by laying it
down on an even surface.
— If neck is flat, move on to Step 2
.
— If there are gaps between the surface and
the neck, place sandpaper, grit side up, on
the flat surface and rub the neck on the
sandpaper (as shown in Figure
14) until
the neck is flat.
Fretboard
Figure 14. Flattening the neck.
Brad Nails