


-14-
H8067 Flat Iron Style Mandolin Kit
3. Insert a #3 x
3
/4" screw through the endpin
(strap button).
4. Screw the endpin into the center hole of the
tailpiece.
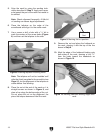
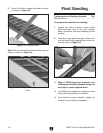
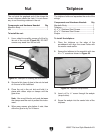
Figure 22. Example of cleaning out the nut slot.
The nut holds the peghead end of the strings the
correct distance above the frets. It is not neces-
sary to cut the string notches in the nut.
Components and Hardware Needed: Qty
Mandolin Body ...................................................
1
Nut ................................................................... 1
To install the nut:
1. Use a chisel to carefully scrape all of the fin
-
ish out of the nut slot (Figure 22). DO NOT
remove any wood from the nut slot.
2. Spread a thin layer of glue in the nut slot and
on the end of the fretboard.
3. Place the nut in the nut slot and hold it in
place with rubber strips or clamps until the
glue dries.
Note: Use wood blocks and pads between
the clamps and the neck to protect the instru
-
ment.
4. Wipe away excess glue before it sets, then
allow the glue to dry for 24 hours.
Nut
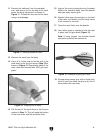
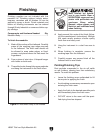
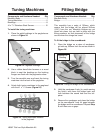
Figure 23. Tailpiece components.
The tailpiece holds and separates the ends of the
strings.
Components and Hardware Needed: Qty
Mandolin Body ...................................................
1
Tailpiece ............................................................
1
#1 x
3
/8" Stainless Steel Screws ........................ 2
#3 x
3
/4" Stainless Steel Screw .......................... 1
Endpin ...............................................................
1
To install the tailpiece:
1. Place the tailpiece on the edge of the
soundboard and align the screw holes with
the marks made earlier.
2. Secure the tailpiece to the mandolin with two
#1 x
3
/8" screws as shown in Figure 23.
Tailpiece
Nut Slot