


–5–
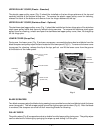
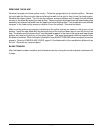
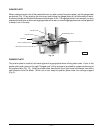
UPPER AND LOWER PULLEYS
The upper and lower pulleys are assembled on the upper and lower pulley shafts; the latch on each
pulley should be seated in the groove of the pulley shaft (Fig. 7). Pulleys can be removed after the blade
has first been loosened and removed. Upper and lower pulleys are interchangeable.
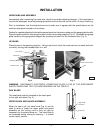
COLUMN GUARD
The column guard (Fig. 5) covers the return loop of the moving blade and must always be in place
during sawing. To remove the column guard for cleaning or blade change, first remove the right table
and the upper pulley cover. You may want to remove the lower cover (scrap pan) as well. Then, lift
the column guard up to free it from the two drive-pin or shoulder-screw heads on the column that it
hangs from.
Fig. 7 Fig. 8
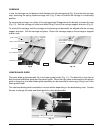
TABLES — RIGHT and LEFT
During use, the right and left tables (Fig. 1) are secured underneath by pins and clamps. To remove
the tables for cleaning: Raise the gauge plate to its vertical position; lift the right side of the right table
up; and, remove the table from the two pins. After the right table is removed, the left table can be
removed: Lift the left side of the left table up; and, shift it to the right to free it from the two pins.
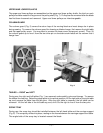
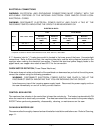
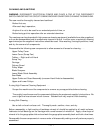
SCRAP TRAY
During use, the scrap tray should be installed between the left-hand table and the carriage support
(Fig. 8). The scrap tray slides into place, resting on the frame between the carriage support and table.
The angled side of the scrap tray is located nearest the blade.
PL-40832-1
LATCH
SHAFT
PULLEY
PL-40835-1
SCRAP TRAY