


— 6 —
INSTALLATION
Before installing the fryer, verify that the electrical service agrees with the specifications on the fryer
data plate which is located on the inside of the door panel.
UNPACKING
Immediately after unpacking the fryer, check for possible shipping damage. If the fryer is found to be
damaged, save the packaging material and contact the carrier within 15 days of delivery.
Do not use the door or its handle to lift or move the fryer.
LOCATION
The fryer may be installed at 0" clearance from the back or side walls. A 16" (40.6 cm) clearance is
required between the fryer and any open top flame burner. Position the fryer for easy accessibility
for service.
INSTALLATION CODES AND STANDARDS
Your Hobart fryer must be installed in accordance with:
1. State and local codes.
2. The National Electrical Code, ANSI/NFPA No. 70 (latest edition). Copies may be obtained from the
National Fire Protection Association, Batterymarch Park, Quincy, MA 02269.
3. NFPA Standard #96.
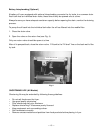
ASSEMBLY
The fryer must be restrained with adequate ties to prevent tipping when installed in order to avoid the
splashing of hot liquid.
Legs
Position fryer in an open space near the final installation area. Tilt fryer on its side, being careful to
avoid scratching the finish. Thread legs into mounting holes provided on bottom of fryer by screwing
in a clockwise rotation until tight.
Carefully raise fryer to its normal position and place it in the installing location.