


44
2. Refrigeration System Pump-Down Procedure
1)Removethefrontpanel.Movethepowerswitchtothe"OFF"position,thenunplugthe
unit.
2) Remove the left side panel.
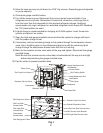
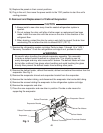
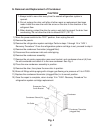
3) Connect the gauge manifold hoses to the receiver service valve (high-side) and the rail
low-side access valve. See Fig. 1.
Note: Be sure the high-side gauge manifold hose is on the receiver service valve
before opening the receiver service valve.
4) Run in the receiver service valve stem all the way until tight.
Note: Be sure the receiver service valve stem is seated all the way in and tight.
5)Plugtheunitbackin,thenmovethepowerswitchtothe"ON"position.
6)Movetherailswitchtothe"NORMAL"position.Thereisa2‑minutedelaybeforethe
compressor starts. Once the compressor starts, the system pump-down begins.
7) When the low-side gauge indicates a vacuum, close the high and low-side rail service
valves completely. Run in the rail service valve stems all the way until tight.
Note: Be sure the rail high and low-side service valve stems are seated all the way in
and tight.
8)Movethepowerswitchtothe"OFF"position,thenunplugtheunit.
9) Back out the receiver service valve stem all the way until fully seated. Remove the
high-side gauge manifold hose.
Note: Be sure the receiver service valve stem is backseated all the way out and tight.
10) Use a backup wrench and disconnect the rail refrigerant tubes from the rail high and
low-side service valves. Use a backup wrench when loosening the ttings. See Fig. 1.
11) Remove the screw securing the rail service valve bracket.
12) Disconnect the power supply cord connector, rail thermistor connector, and perimeter
heater/rail fan connector.
13) Remove the wire cover below the control box.
14) Remove the upper and lower attachment nuts and washers from the control box and
the hex head bolt from the base of the refrigeration system cartridge. See Fig. 1.
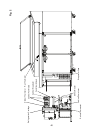
15) Slide the refrigeration cartridge forward. Support the evaporator as it clears the
evaporator case. See Fig. 2.
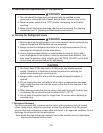
CAUTION
1. Be careful when handling the cabinet evaporator assembly. This assembly
includes a defrost heater sheathed in a glass tube. This sheathing can be
easily damaged and may also cause cuts if broken. The defrost heater will
also be hot after a defrost. Use gloves when handling and avoid touching the
glass directly. Also prevent the defrost heater from touching other parts.
2. To avoid refrigerant leaks, be sure to prevent the refrigeration piping from
coming into contact with the frame when removing and replacing the
refrigeration cartridge.