


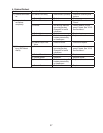

45
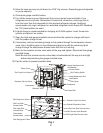
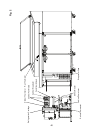
16) Once the repair is made, replace the refrigeration cartridge back into its correct
position. Support the cabinet evaporator as it enters the cabinet evaporator case.
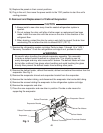
17) Reconnect the rail side refrigerant tubes. Use a backup wrench and tighten the ttings
1/6 turn beyond fully seated. Use a backup wrench when tightening the ttings.
18) Secure the rail service valve bracket back in its correct position.
19) Secure the refrigeration cartridge with the attachment nuts, washers, and the hex head
bolt.
20) Replace the wire cover and panels in their correct positions.
21) Connect the high-side gauge manifold hose to the rail high-side access valve.
22) Use an electronic leak detector or soap bubbles to check for leaks. Add a trace of
refrigerant to the system (if using an electronic leak detector), and then raise the
pressure using nitrogen gas (140 PSIG). DO NOT use R-404A as a mixture with
pressurized air for leak testing
23) Evacuate the rail system. Close the gauge manifold valves.
24) Open the rail high and low-side service valves. Back out the rail high and low-side
service valve stems all the way until fully seated.
Note: Be sure the rail high and low-side service valve stems are backseated all the way
out and tight.
25) Remove the gauge manifold hoses.
26) Cap the valves to prevent possible refrigerant leaks.
27) Use an electronic leak detector or soap bubbles to check the rail refrigerant
connections for refrigerant leaks.
28) Reconnect the power supply cord connector, rail thermistor connector, and the
perimeter heater/rail fan connector.
29)Plugtheunitbackin,thenmovethepowerswitchtothe"ON"positiontostarttheunit's
cooling process.