39
12) Remove the Insulation and the two Clamps on the Expansion Valve Bulb.
13) Disconnect the brazing-connections of the Expansion Valve and the Copper Tube - Low
Side from the Evaporator, using brazing equipment.
14) Braze the new Evaporator with nitrogen gas flowing at the pressure of 3-4 PSIG.
15) Replace the Drier.
16) Check for leaks using nitrogen gas (140 PSIG) and soap bubbles.
17) Evacuate the system and charge it with refrigerant. See the Nameplate for the required
refrigerant charge.
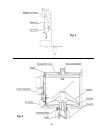
18) Remove the four Socket Head Cap Screws at the bottom of the Evaporator.
19) Disconnect the Hose from the Evaporator.
20) Lift off the Evaporator.
HOUSING AND MECHANICAL SEAL
21) Remove the four Hexagon Bolts securing the Housing to the Gear Motor.
22) Remove the Mechanical Seal fixed on the Housing.
Note: The Mechanical Seal consists of two parts. One moves along
with the Auger, and the other is fixed on the Housing. If the
contact surfaces of these two parts is worn or scratched, the
Mechanical Seal may cause water leaks and should be
replaced.
23) Replace the Bearing inside the Housing using a fitting tool, if the Bearing is worn or
scratched.
Note: Replacing the Bearing requires a fitting too. If one is not
available, replace the whole Housing. Be sure to install
the O-ring


