


97
7) Pour the cleaning solution over the extruding head until the evaporator assembly and
the reservoir are full and the solution starts to overow into the drain pan.
Note: If there is excess scale on the extruding head, ll the evaporator assembly and
reservoir as described above, then use a clamp on the reservoir hose between
the reservoir and evaporator assembly to block ow. Pour additional cleaning
uid over the extruding head until the evaporator assembly is completely full.
8) Replace the spout and strap in their correct positions.
9) Allow the icemaker to sit for about 10 minutes before operation. If you placed a clamp
on the reservoir hose in step 7, remove it before operation.
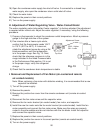
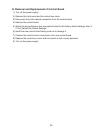
10) In bad or severe water conditions, clean the oat switch assembly as described below.
See Fig. 15. Otherwise, continue to step 1.
a. Remove the oat switch assembly from the reservoir cover.
b. Wipe down the oat switch assembly with the cleaning solution.
c. Rinse the oat switch assembly thoroughly with clean water.
d. Replace the oat switch assembly in its correct position.
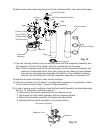
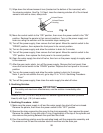
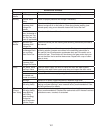
Reservoir
Reservoir Cover
Float Switch Assembly
Fig. 14
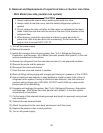
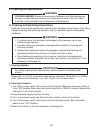
Strap
Spout
Chute
Rubber O-Ring
Packing
Proximity Switch
Packing
Ties
(Hook and Loop)
Chute Insulation
Bafe
Plate
Packing
Bin Control Assembly Mount
Actuator
Shaft
Extruding Head
Evaporator
Assembly
Reservoir
Nylon O-Ring
(if applicable)
Fig. 15
6) Remove the strap connecting the spout to the chute assembly, then remove the spout.