


52
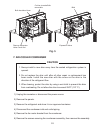
6. EXPANSION VALVE
IMPORTANT
The water in the refrigeration circuit may exceed the capacity of the drier
and freeze in the expansion valve. Always install a new drier every time the
sealed refrigeration system is opened. Do not replace the drier until after all
other repair or replacement has been made.
1) Unplug the icemaker or disconnect the power source.
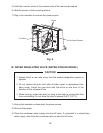
2) Remove the top panel, rear panel and side panel (R).
3) Recover the refrigerant and store it in a proper container, if required by an applicable
law (see “1. [b] REFRIGERANT RECOVERY”).
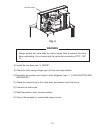
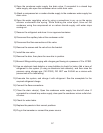
4) Remove the expansion valve using brazing equipment. Protect the evaporator and
pipes from excessive heat with damp cloths or similar.
5) Remove the insulation hose from the expansion valve sensor (bulb) and remove the
bulb.
6) Remove the drier using brazing equipment.
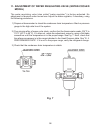
7) Braze in the new expansion valve. Protect the body of the valve from excessive
heat, and use nitrogen at a pressure of 0.2 - 0.3 bar when brazing.
8) Install the new drier (see “4. DRIER”).
9) Check for leaks using nitrogen gas (10 bar) and soap bubbles.
10) Evacuate the system and charge it with refrigerant (see “1. [c] EVACUATION AND
RECHARGE”).
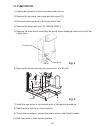
11) Attach the bulb to the suction line in position. Be sure to secure it using a wire or
clamp and replace the insulation.
12) Refi t the panels in their correct positions.
13) Plug in the icemaker or connect the power source.
WARNING
Always protect the valve body by using a damp cloth to prevent the valve
from overheating. Do not braze with the valve body exceeding 239°F (115°
C).