


68
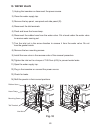
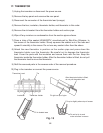
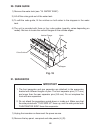
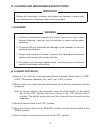
20. CUBE GUIDE
1) Remove the water tank (see “19. WATER TANK”).
2) Lift off the cube guide out of the water tank.
3) To refi t the cube guide, fi t the notches on both sides to the stoppers in the water
tank.
4) The unit is provided with three or four cube guides (quantity varies depending on
model). Be sure to locate the vertical fl anges on the outside edges.
Fig. 18
Cube Guide
Vertical Flange Notch
Stopper
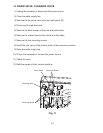
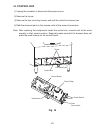
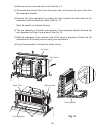
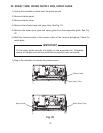
21. SEPARATOR
IMPORTANT
1. The front separator and rear separator are attached to the evaporator
bracket with different lengths of pins. The front separator pins (12.7 mm)
are longer than the rear separator pins (9.8 mm). Do not misplace the
front and rear separators.
2. Do not attach the separators upside down or inside out. Make sure that
the side printed with “THIS SIDE UP” faces up, and the side printed with
“EVAPORATOR SIDE” faces the evaporator.
1) Unplug the icemaker or disconnect the power source.
2) Remove the top panel, rear panel and side panels (L) (R).