


19 300614000
Note: If your Cooling Unit is equipped with a water tank water level float control, close shutoff valve in
plain water inlet supply line.
3. Make sure end of water tank drain hose is routed to floor drain, then remove plug from end of hose and
allow water to drain from tank.
CAUTION: Never use an ice pick or other instruments to remove ice from evaporator coils.
Such practice can result in punctured refrigeration circuit.
4. Allow ice bank to melt. Hot water may be used to speed melting.
5. Thoroughly rinse inside of water tank with clean water.
6. Install plug in end of water tank drain hose.
Note: If your Cooling Unit is equipped with a water tank water level float control, open shutoff valve in
plain water inlet supply line.
7. Fill water tank with clean water until water starts flowing from water tank overflow hose. USE LOW
MINERAL CONTENT WATER WHERE A LOCAL WATER PROBLEM EXISTS.
8. Install Cooling Unit top cover and secure with two screws.
9. Connect electrical power to Cooling Unit at disconnect switch.
DOUBLE LIQUID CHECK VALVE ASSEMBLIES YEARLY MAINTENANCE (OR AFTER
WATER SYSTEM DISRUPTIONS)
(see Figures 2 and 6)
WARNING: The two double liquid check valve assemblies must be inspected and serviced
at least once a year under normal circumstances, and after any disruptions (plumbing
work, earthquake, etc.) to the water supply system that might cause turbulent (erratic) flow
of water through the system. Fouled liquid check valves could cause CO
2
gas to back flow from
the carbonated water tank into the water system and create a health hazard in the system.
The two double liquid check valve assemblies are located in plain water lines connected between the plain
water cooling coils and the carbonated water tank. Inspect and clean the double liquid check valve assemblies
as follows:
1. Disconnect electrical power from Cooling Unit at disconnect switch.
2. Close shutoff valve in plain water inlet supply line.
3. Note pressure setting on carbonator CO
2
regulator, then turn regulator adjusting screw to the left
(counterclockwise) until regulator gage reads 0-psi.
4. Pull up on carbonator tank relief valve to release CO
2
pressure from tank.
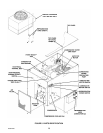
5. Remove two screws securing Cooling Unit top cover, then remove cover.
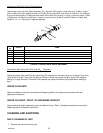
6. Remove double liquid check valve assembly from plain water line connected between plain water cooling
coil and carbonated water tank.
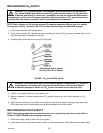
7. Remove one check valve from the other, then disassemble each check valve as shown in Figure 6.