


19
630460150
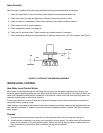
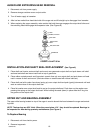
3. Remove Dispense Tray Cover.
4. Use an open end wrench on auger nut connected to bearing and turn counterclockwise to remove
assembly.
5. Remove worn bearings. Replace with new bearings and then reinstall assembly.
NOTE: If auger turns with nut, remove cover on top of gearmotor stator and hold motor while loosen-
ing nut.
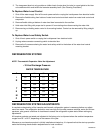
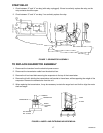
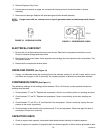
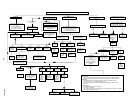
FIGURE 10. OVERLOAD CHECK
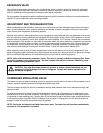
FIGURE 11. COMPRESSOR CHECK
ELECTRICAL CHECKOUT
1. Be sure the unit is disconnected from the power source. Remove the compressor electrical box cover.
Check for obvious damage and loose wires.
2. Disconnect the fan motor leads. Since capacitors store energy, short the capacitor with a screwdriver. This
will prevent shocks.
3. Disconnect the compressor terminal wires.
OVERLOAD CHECK (See Figure 10)
1. Using a volt-ohmmeter check the continuity across the overload, contact #1 and #3. If none, wait for unit to
cool down and try again. If still no continuity, the overload protector is defective and should be replaced.
COMPRESSOR CHECK (See Figure 11)
The resistance readings on the windings will be between 0.25 to 10.00 ohms, a meter capable of these low
readings must be used.
1. Check between “C” and “R.” Replace the compressor if there is no continuity as the run windings are open.
2. Check between “C” and “S.” Replace the compressor if there is no continuity as the start windings are
open.
3. Check between “C” and “R” or “S” and the shell of the compressor. If there is continuity, replace the com-
pressor as the motor is grounded.
4. Check between screw terminal on the overload and “C” on the compressor. Check and repair the lead or
connections if there is no continuity.
CAPACITOR CHECK
1. Check or replace start capacitor, disconnect bleed resistor before checking for shorted capacitor.
2. Check or replace run capacitor (if supplied) check for shorted capacitor or either terminal grounded to case.