


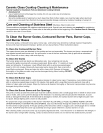


General Cleaning & Maintenance
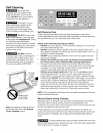
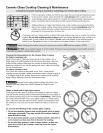
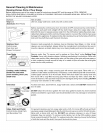
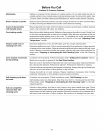
Pull up with finger
Storage Drawer
Use the storage drawer for storing cooking utensils. The drawer can be removed to
facilitate cleaning under the range. Use care when handling the drawer.
To Remove Storage Drawer:
1. Open the drawer to the fully opened position.
2. Locate the glide lever on each side of drawer; pull up on the left glide lever and push
down on the right glide lever (see figure 1).
3. Pull the drawer away from the range.
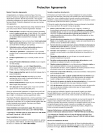
To Replace Storage Drawer:
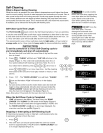
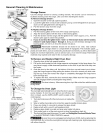
1. Pull the bearing glides to the front of the range (see figure 2).
2. Align the drawer glides with the slots on the bearing glides.
3. Push the drawer into the range until the glides levers "click" (approx. 2 in.). Pull the
Pushdownwithfinger Glide drawer open again to seat it into position.
Figure 1 4. If you do not hear the glide levers "click" or if the drawer does not feel seated,
remove it and repeat steps 1 through 3. Doing so will minimize damage to the
bearing glides. Do not try to force the drawer into place.
Flammable materials should not be stored in an oven, near surface
elements or in the storage drawer or compartment (if equipped). This includes paper,
plastic and cloth items, such as cookbooks, plasticware and towels, as well as flammable,
liquids. Do not store explosives, such as aerosol cans, on or near the range. Flammable
_- Figure 2 materials may explode and result in fire or property damage.
Storage Drawer
i
To Remove and Replace Right Oven Door ....
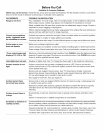
1. Open the door to the fully opened position.
2. Pull up the lock located on both hinge supports and engage it in the hinge levers. You
may have to apply a little downward pressure on the door to pull the locks fully over
the hooks.
3. Grab the door by the sides, pull the bottom of the door up and toward you to disen-
gage the hinge supports. Keep pulling the bottom of the door toward you while rotat-
ing the top of the door toward the range to completely disengage the hinge levers
Lock in normal from the hinge slot.
position 4. To replace the door, reverse the door removal steps. Make sure the hinge supports
are fully engaged before unlocking the hinge levers.
_ The door is heavy. After removing door, lay it flat on the floor with its inside
facing down.
gaged
for door removal
Hir _e slot
To Change the Oven Light
The oven light automatically turns on when the door isopened
(some models). To turn the oven light on and off when the
door is closed, use the OVEN LIGHT switch located on the
control panel.
1. Turn electrical power off at the main source or unplug the
oven.
2. Wear a leather-faced glove for protection against possible broken glass.
3. Press wire holder to one side to release the glass shield.
4. Replace bulb with a new 40 watt appliance bulb.
5. Replace glass shield in socket and snap wire holder into place.
6. Turn power back on at the main source (or plug the appliance back in).
7. The clock will then need to be reset. To reset, see Setting the Clock and Minute Timer
in the ELECTRONIC OVEN CONTROL manual.
Be sure the oven is unplugged and all parts are COOL before replacing the
oven light bulb. Do not turn the oven light on during a self-cleaning cycle. High temperature
will reduce lamp life.
41