


Setting Surface Controls
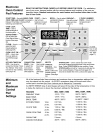
FEATURE OVERVIEW
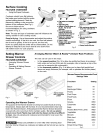
Operating the Bridge Radiant Surface Element Control
Operating the Bridge Surface Element
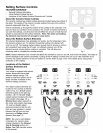
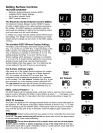
The cooktop is equipped with a "BRIDGE" surface element located at
the left cooktop position (See Fig. 1). Indicator lights on the control
panel are used to indicate what portions of the Bridge element will heat.
The Bridge element begins with the left FRONT position only (Fig. 2)
and when selected with the +BRIDGE element (Fig. 3) it will provide a
combination of 2 heating surfaces. When set for ALL 3 element
positions the left rear element is added for a total combination of 3 even
heating surfaces (See Fig. 4).
The Bridge element is designed for rectangular (for example a griddle)
or oval shaped cookware. If needed for normal cookware, the left front
element may be used as a singe element.
ALL_ I
Fig. 1 Fig. 2
ALLO I
+BRIDGE o U
FRONT _ •
Fig, 3
ALL@ I
+BRID6E _ l
FRONT _ •
Fig, 4
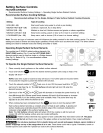
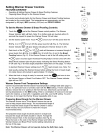
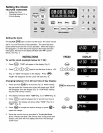
To Operate the Bridge Surface Element:
1. Place correctly sized cookware on the radiant surface element.
2. Touch and hold the I pad for the Bridge element position until a
beep is heard. The display will show" - - ". NOTE: Each time a pad is
touched a beep will sound. If no further pads are touched within 10
seconds the request to power the element ON will clear.
3. Select the FRONT (See Fig. 2), +BRIDGE (See Fig. 3) or ALL 3 elements
(See Fig. 4) to heat by pressing the EL_T -
pae once, twice or three times
(Figs. 4 & 5 shows indicator lights with ALL 3 elements selected).
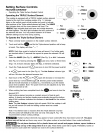
4. Touch the Bridge element H__ pad once to turn ON the power level
HI or Lo(_ pad once for Lo (See Fig. 4). The Hot Surface indicator
light wilt turn ON when the element becomes hot.
5. Each touch of the Lo_ or Hi(_ pad will decrease or increase the
power level by 1/2 from 9.0 through 3.0. Simmer power levels between
3.0 and 1.0 will decrease or increase by .2 increments. Lo is the lowest
power level available. Note: The power level may be adjusted at any time
while the element is ON.
6. When cooking has been completed touch the _O pad once to turn the
element OFF.
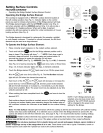
Each surface element provides a constant amount of heat at each setting.
A glowing red surface heating area extending beyond the bottom edge of
the cookware indicates the cookware is too small for the surface heating
area.
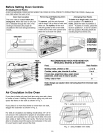
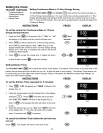
ALL _ I HI
+BRIDGE o I
Lo
LEFT
SIDE
HOTSURFACE
Fig.5
NOTE: If all 3 Bridge elements are
selected, any previous power level
setting for the LEFT REAR element
will be changed to the power level
setting for the Bridge.
Note: The Hot Surface indicator light wilt remain ON if the cooktop is still hot and wilt remain ON until the heating
surface area has cooled sufficiently. If no element size is chosen when the Bridge element is turned ON, the
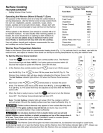
control wilt default to the left front element only. See page 9, Fig. 1 for recommended surface cooking settings.
Radiant surface elements may appear to have cooled after they have been turned off. The glass
surface may still be hot and burns may occur if the glass surface is touched before it has cooled sufficiently.
Do not place aluminum foil or plastic items such as salt and pepper shakers, spoon holders or
plastic wrappings on top of the range when it is in use. These items could melt or ignite. Potholders, towels or
wooden spoons could catch fire if placed too close to the surface elements.
11