


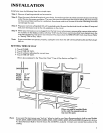
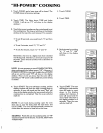

INSTALLATION
Install your oven by following these four simple steps:
Step I: Remove all packing material and accessories.
Step 2:
Place the oven in the level location of your choice, but make sure there is at least one inch of space on the top
and at the rear for proper ventilation. The top of the oven should be kept clear and the plastic feet must be kept
on the oven so there is air flow for ventilation. An exhaust outlet is at the rear of the oven. Blocking the outlet
can damage the oven.
Step 3:
Step 4:
Plug your oven into a Standard 120 volt household outlet. Be sure the electrical circuit is at least 15 amp and
that your microwave oven is the only appliance on the circuit.
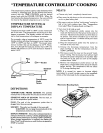
When your microwave oven is plugged in for the first time or when power resumes after a power interruption,
the numbers in the display window will show "0:00" plus the hours and minutes that have elapsed since the
oven was plugged in or the power was restored. This means that the TIME OF DAY clock must be set. Refer
to "Setting Time of Day" below.
Note: Ifyour oven does not operate properly, unplug the oven from the 120 volt household outlet and then plug it
back in.
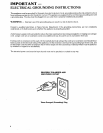
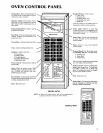
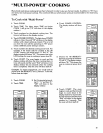
SETTING TIME OF DAY
• Touch CLEAR.
• Touch TIME OF DAY.
• Touch numbers indicating the correct time.
• Touch TIME OF DAY.
(This is also explained in the "Easy Use Chart" Time of Day Section on Page 11.)
II
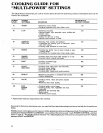
DIMENSIONS
IIII
Height: 15-3/4"
Width: 24"
Depth: 20-5/8"
Weight: 62 Ibs.
When one side is installed flush
to the wall, the opposite side or
top must be open.
Note:
If you want this microwave oven "built-in," either by itself or over Sears Kenmore electric built-in oven Models
4214X, 4215X, 42209, 42249, 42259, 4228X, 4233X, 42359, 4238X, 42489, 42549 and 4258X (X may be 2, 4, 6, 8, or
9), Sears Kenmore Built-in Trim Kit Stock No. 22-84092 is available. Contact your nearest Sears store or the
catalog.
7