


56
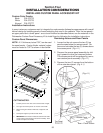
4. Pull the bottom of the outer door panel out-
ward and slide it down approximately ¼” to
½”. The panel will then be free for removal.
(Fig. 4-1, inset)
Set the door panel aside; it
will be replaced with a new custom panel.
5. Remove the existing door insulation and dis-
card.
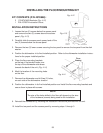
Installing Custom Panels
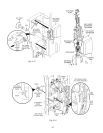
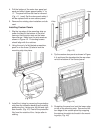
1. Slip the top edge of the mounting strip up
under the tabs at the bottom of the door
frame so that the strip rests on the lower
frame flange. Make sure the strip seats as
shown in Figure 4-2. Protruding screws
should align with the notches.
2. Using the end of a flat bladed screwdriver,
push in on the three (3) tabs to lock the
mounting strip into place.
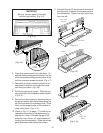
3. Install the J-strips by removing the protective
strip from the adhesive backing and carefully
positioning the J-strips over the left and right
door frames.
(Fig. 4-3)
Peel off the protective
film from the outside of the J-strips after in-
stalling.
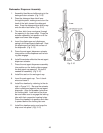
4. Tip the custom door panel as shown in Figure
4-4, and insert the top edge into the rear chan-
nel at the bottom of the control panel.
5. Straighten the panel and rest the lower edge
on top of the mounting strip. Secure the bot-
tom edge of the custom panel by snapping
the retainer trim strip into the slot in the mount-
ing strip.
(Fig. 4-6)
(Fig. 4-2)
(Fig. 4-3)
(Fig. 4-4)