


58
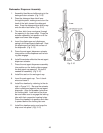
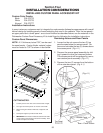
Installing Heavy Duty Door Springs
Standard door springs may need to be replaced by heavy duty springs designed to compensate for the
increased weight of the door resulting from the installation of custom panels. Perform the following
tests to determine whether the heavy duty springs need to be installed.
Heavy Duty Door Spring Kit:
Kit contains two (2) heavy duty door springs and instruction sheet.
Kit P/N 3379643
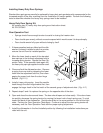
Door Operation Test:
• Springs should have enough tension to assist in closing the heavier door.
• Door should open evenly, without excessive speed which would cause it to drop abruptly.
• Door should remain fully open without closing by itself.
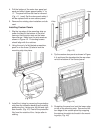
1. If these operation tests are failed and the dish-
washer is already installed under the counter,
remove the unit from its installed position.
2. Move the lower hook on each of the standard
door springs to the farthest adjustment slot to
increase spring tension. Repeat the Door Op-
eration Tests. If the operation tests again fail,
the heavy duty springs supplied must be used.
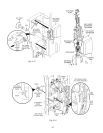
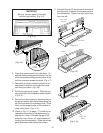
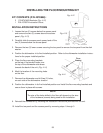
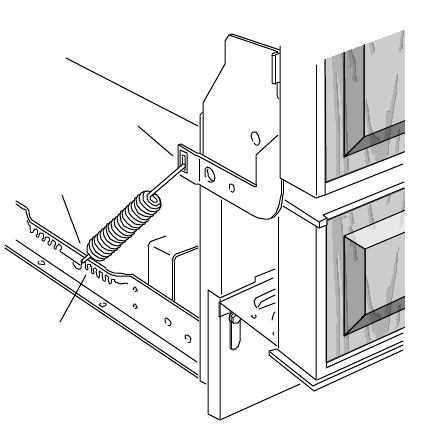
3. Close and lock the dishwasher door. Remove
a spring from one side by releasing the lower
hook from the adjustment slot first, then disen-
gaging the upper hook from the door hinge
bracket.
(Fig. 4-11)
4. Install a heavy duty spring. Insert the smaller
hook through the door hinge bracket first, then
engage the larger hook in the first notch of the second group of adjustment slots.
(Fig. 4-11)
5. Repeat steps 3 and 4 to replace the spring on the opposite side of the door.
6. Open and close the door several times. The door should open and close easily. If the door closes
too quickly, decrease the spring tension by moving the lower hook of each spring one (1) notch
toward the back of the dishwasher. Springs should be in the same position on the left and right
sides. Perform the Door Operation Tests again. Continue to adjust the door spring tension as
necessary until the Door Operation Tests confirm proper spring adjustment.
7. Install the dishwasher in the final installed position by following the installation instructions pro-
vided with the unit.
Door Hinge
Bracket
Spring
Lower End
Adjustment
Slots
Fig. 4-11