


13
2. The strength (REG or BOLD) indicator will
flash. Press the “+” (plus) or “-” (minus)
button to select the brew strength desired
(REG or BOLD).
3. Press the SET button to program the
Brew Strength setting. Two short beeps
will sound, indicating programming is
complete. The programmed strength will
remain active until steps 1-3 are repeated
or power is interrupted for more than
60 seconds.
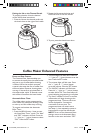
Variable Warmth Control/Selectable
Automatic Shutoff
For glass carafe models only, the coffee
maker can be programmed to keep coffee
warm for a specific length of time and
temperature. This feature is not available on
thermal carafe models.
NOTE: If you do not complete the
programming steps within 10 seconds, the
settings will be maintained and the coffee
maker will exit to the Default mode.
To program and activate the Warm Timer/
Temperature setting:
1. Press the MENU button 4 times to enter
the “Warm Timer / Temperature” mode.
The “Warm” indicator and time digits
will flash until this programming cycle
is complete.
2. Press the “+” (plus) or “-” (minus) button
to select the length of warm time desired.
The time range can be selected between
0.5 and 4 hours in 30-minute increments.
3. Press the SET button. The “Warm”
indicator and temperature setting (LOW,
MED, or HIGH) will flash. Press the “+”
(plus) or “-” (minus) button to select the
temperature (LOW, MED, or HIGH).
4. Press the SET button to program the
Warm Timer/ Temperature setting.
Two short beeps will sound, indicating
programming is complete. The
programmed temperature will remain
active until steps 1-4 are repeated or
power is interrupted for more than
60 seconds.
Using the Programmed Automatic
Brew Time Again
After setting up your Automatic Brew Time,
you can use the following directions to reuse
your previously programmed time setting.
To re-activate the Programmed Automatic
Brew Time:
1. Press the MENU button 1 time to enter
the “Auto Brew Timer” mode. The “Auto”
and “OFF” indicators will flash. Press the
“+” (plus) or “-” (minus) button to select
“ON”. Press the SET button.
2. The hours digits will flash next. Press the
SET button to set the hour.
3. The minutes digits will flash next. Press
the SET button to set the minutes.
4. The “AM/PM” indicators will flash next.
Press the SET to select AM or PM.
Two short beeps will sound indicating
programming is complete.
5. The “Auto” indicator will turn on and the
coffee maker will begin brewing at the
programmed time. The time that is set
will be displayed for 3 seconds as a
reminder of the set time. The programmed
time will remain active until steps 1-4
are repeated or power is interrupted
for more than 60 seconds.
NOTE: To reactivate the programmed
time, press and hold the BREW
button. The “Auto” indicator will turn
on and the coffee maker will begin
brewing at the programmed time.
Brew Strength
The coffee maker can be programmed
to brew coffee at regular (REG) or
bold (BOLD) strengths.
NOTE: If you do not complete the
programming steps within 10 seconds,
the settings will be maintained and the
coffee maker will exit to the default mode.
To program and activate the Brew Strength:
1. Press the MENU button 2 times to enter
the “Brew Strength” mode. The “Brew
Strength” indicator will flash until this
programming cycle is complete.
W10474602B_Coffee Maker.indd 13 6/8/12 1:18 PM