


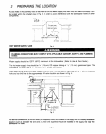
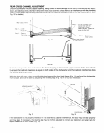
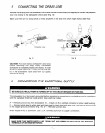
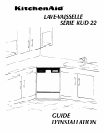

To maintain dishwasher position and alignment, locate the adjustable brackets at the upper tank corners as
shown on Fig. 13 and secure them to the countertop with self-drilling flat head wood screws (supplied). Drill
a pilot hole to a %I” (19 mm) maximum depth in the centre of the bracket mounting hole using a l/e” (3 mm)
drill bit. DO NOT exceed %” (19 mm) depth. NOTE: Make sure screw heads will not interfere with the
top of the door. If these brackets are not compatible with your countertop, the dishwasher may be anchored
to the floor, with a l/4” (6 mm) lag bolt (not supplied), through the hole in each side of the dishwasher frame
as shown in Fig. 12.
Adjustable bracket
m mstallat~on posltlon ,
Flat head wood screw
Fig. 13
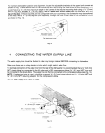
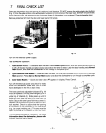
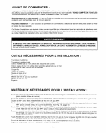
4 CONNECTING THE WATER SUPPLY LINE
The water supply line should be flushed to clear any foreign material BEFORE connecting to dishwasher.
Make sure there are no sharp bends or kinks which might restrict ,Nater flow
To facilitate connection of the water line from the rear of the dishwasher it is recommended that a Ye” (9.5 mm)
NPT street elbow be connected to the fill valve and a 90’ compression elbow (Ye” (9.5 mm) NPT one end)
be connected to the street elbow. The supply line can then be connected to the compression elbow (see Fig. 14).
NOTE: If galvanized pipe is used, substitute a second 3/a” (9.5 mm) street elbow and l/2” (13 mm) NPT and
Ye” (9.5 mm) NPT reducing adaptor for the compression elbow.
Turn on water supply and check for leaks
Compresslon flu1
Compresslon sleeve .,
%I* (16 mm) O.D. copper
water line
90” cc;mpresslon elbow -~
(VS (9.5 mm) NPT one end)
DIshwasher
fill valve
Fig. 14