


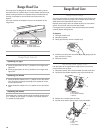

3. Mark and cut a 6" (15.2 cm) round vent opening.
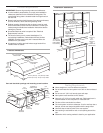
Venting through cabinet top
1. Mark the location where vent cover will be installed in the
cabinet top and cut a 6" (15.2 cm) round vent opening for the
vent cover.
IMPORTANT: Do not terminate exhaust into a dead air space
such as an attic or enclosed soffit.
Prepare Location
■ For vented installations, it is recommended that the vent
system be installed before hood is installed.
■ Do not cut a joist or stud unless absolutely necessary. If a
joist or stud must be cut, then a supporting frame must be
constructed.
■ Before making cutouts, make sure there is proper clearance
within the ceiling or wall for vent fittings.
■ Check that all the installation parts and the box with filters
have been removed from the shipping carton.
Preparation
1. If possible, disconnect power and/or gas supply and move
freestanding or slide-in range from cabinet opening to
provide easier access to rear wall.
2. Select a flat surface for assembling the hood. Cover that
surface with a protective covering such as a blanket or
cardboard during assembly.
INSTALLATION INSTRUCTIONS
Venting Options
General venting installation
For vented installations:
Make necessary cuts in the wall for vent fittings.
NOTE: The hood exhaust may be directed out the rear of the
hood by removing the motor assembly and rotating it so the
exhaust collar is located on the rear of the hood. If this is desired,
see “Change Hood to Rear Exhaust” section to change the
exhaust direction.
IMPORTANT: Make sure the vent system is installed before
installing range hood.
For recirculating installations:
A vent system and vent grill (not provided) that directs the
recirculated air back into the room either through the soffit or
through the cabinet top is required. Use Recirculation Kit Part
Number 4396565. For ordering information, see “Assistance or
Service.”
IMPORTANT: If venting through the cabinet top, do not
terminate the exhaust into dead air space such as an attic or
enclosed soffit.
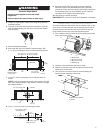
When venting through the soffit, assemble the vent system (not
provided) you will use over the exhaust collar, but do not attach
the vent system yet.
NOTE: The vent system can exhaust out the front of the soffit or
be rotated to exhaust out the side or end of the soffit.
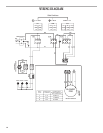
Venting through the soffit
1. On a flat surface with a protective covering, assemble the
vent system you will use (not provided) over the exhaust
collar, but do not attach the vent system yet.
NOTE: The vent system can exhaust out the front of the soffit
or be rotated to exhaust out the side or end of the soffit.
2. Measure distance “A” (from top of hood to centerline of 6"
[15.2 cm] round vent). Mark the distance “A” on soffit.
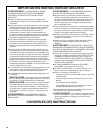
WARNING
Excessive Weight Hazard
Use two or more people to move and install range.
Failure to do so can result in back or other injury.
■ Check with a qualified electrician if you are not sure range
hood is properly grounded.
■ Do not have a fuse in the neutral or ground circuit.
■ The range hood must be connected with copper wire only.
■ The range hood should be connected directly to the fused
disconnect (or circuit breaker) box through flexible armored or
nonmetallic sheathed copper cable.
■ Wire sizes (copper wire only) and connections must conform
with the rating of the appliance as specified on the model/
serial rating plate.
■ Wire sizes must conform to the requirements of the National
Electrical Code, ANSI/NFPA 70 (latest edition), or CSA
Standards C22.1-94, Canadian Electrical Code, Part 1 and
C22.2 No. 0-M91 (latest edition) and all local codes and
ordinances.
■ A ¹⁄₂" (12.7 mm) UL listed or CSA approved strain relief must
be provided at each end of the power supply cable (at the
range hood and at the junction box).
A
A
B
C
D
E
A. Vent system D. Ceiling or soffit
B. Vent cover E. Hood
C. Cabinet top
6