


13
Non-Vented (recirculating) Installations
1. Connect the vent system to the range hood vent opening.
Seal the connection with clamps.
2. Install charcoal filters. See “Range Hood Care” section.
3. Replace metal grease filters. See “Range Hood Care”
section.
4. Reconnect power.
5. Check the operation of the range hood fan and light.
6. Push the range hood screen back in.
To order replacement kits, see the “Assistance or Service”
section.
Optional Gray Vinyl Trim
A gray vinyl trim strip is included with the range hood to cover the
exposed underside of the cabinet.
Install Optional Gray Vinyl Trim Kit
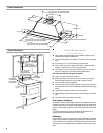
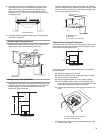
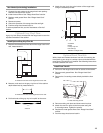
1. Measure the distance from the back of the range hood to the
wall, measurement A.
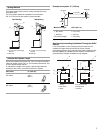
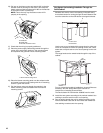
2. Measure, mark and cut the gray vinyl trim to fit the cabinet
depth determined by measurement A.
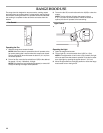
3. Fold both ends of the gray vinyl trim up 90° at the score.
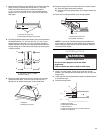
4. Attach the gray vinyl trim to the bottom of the range hood
using the 3 screws provided.
Optional Front Trim Kits
White, black and brushed aluminum front trim for matching the
front panel to your range or cooktop color are included with the
range hood. The white trim is installed. See following instructions
to install a different trim color.
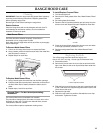
Install Front Trim Kit
1. Pull out on the range hood screen for access to the screws.
2. Remove metal grease filters. See “Range Hood Care”
section.
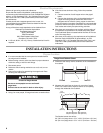
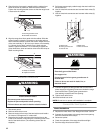
3. Remove the 3 mounting screws directly behind the front
panel.
4. Remove existing trim piece and insert new trim piece.
5. Attach the new trim piece to the front panel using the
3 mounting screws. Tighten the screws.
6. Replace the metal grease filters. See “Range Hood Care”
section.
7. Push the range hood screen back in.
A.Distance from back of the range hood to the wall.
A.Distance from back of the range hood to the wall.
A.Score
A
A
A
A.Cabinet
B.Wall
C.Gray vinyl trim
D.Screws (3)
E.Bottom of range hood
A.Three mounting screws
A
B
C D
E
A