


is possible, the most efficient method of tuning the stove is at the start and with the proper
equipment. The customer who will be operating the stove is an important partner in this
process, so a full understanding of how the stove operates and is maintained is invaluable.
Shortly after the stove is lit an air pressure reading should be taken. To take this
reading, drill a hole suitable for the manometer probe size in the stove pipe directly above the
stove outlet. After pressure readings are finished, simply plug the stove pipe hole with a
suitable sized screw.
Lighting the stove:
1. Remove the catalyst (stainless steel mesh cylinder) from the burn pot.
2. Turn all supply valves on.
3. Turn control knob on carburetor to setting 1.
4. Press on/off control lever on carburetor to start (it pulls up and clicks to shut
stove off and pushes or clicks down to on position).
5. When a small amount of oil begins to appear in the burner bottom, take a
wooden kitchen match and light the oil (a small piece of crumpled tissue
paper can be lit and tossed into the burner if desired, or use an alcohol-gel
fire starter).
6. When oil is lit, replace the catalyst and shut the door (a slightly cracked door
is helpful for a short period of time to aid initial light-up of oil, but should
not be required for more than 30 or so seconds). Until the flue pipe warms
up and draft is initiated, your Oil Classic will burn with a high, yellow/
orange flame. This is normal during start-up. It is simply burning off excess
liquid oil that accumulates in the burner bottom before the catalyst turns red
and begins to vaporize the fuel.
7. Within a few minutes, the stove burner should begin burning blue at flame
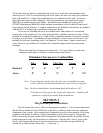
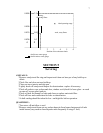
base and yellow at flame tip. At this point a pressure check should be made,
and the draft stabilizer adjusted to within the recommended pressure setting
range (see draft pressure chart on page 7).
8. Run the stove for at least 30 minutes on low or medium to allow the whole
stove and chimney to come up to operation temperature.
9. Turn the control knob to setting 1 and run for about 10-15 minutes and check
the pressure once again.
10. You are now ready to adjust or “tune” your Oil Classic according to the
following carburetor adjustment section.
CARBURETOR ADJUSTMENTS:
Your Oil Classic has a carburetor that has both low-fire (setting 1) and high-fire (setting
6) adjustment screws on the top. They are small slotted screws that are of red color and may
need to be adjusted for correct flame size.
Both low- and high-fire settings have been pre-set at the factory, but depending on your
choice of fuel (#1 or #2 grade), these will usually need to be adjusted for the viscosity of fuel
you are using. Please note that after initial warm-up, it is important to adjust the high flame
first, then the low flame as any adjustments made to the high can affect the low, but not vice-
versa. Below is a description of what the flame should look like at both low– and high-fire:
Low-fire:
The flame should be totally blue with blue flame “spears” or jets dancing
between the inner wall of the burn pot and the catalyst. The catalyst will be dull red to bright
red. There will be blue flame appearing around the fire ring at the burner top. You can
decrease the setting to where there is only the blue spears in the burn pot and little activity of
blue flame at the burner top. However, if there is any yellow flame in the burn pot on low
setting, then the low-fire adjustment screw needs to be increased to a total blue flame condition.
5