


High-fire:
The flame should be bright yellow with a 2/3 fire-box height to where the flame
will begin to break up and terminate just a few inches under the firebrick baffle. The base of
the flame at the burner ring should still be blue, and the catalyst will be a dull red. If the flame
is too high and allowed to impinge on the firebrick baffle too much, the result will be a cooling
of the flame tip, and incomplete combustion, thereby producing smoke and soot. Adjust the
high-fire adjustment screw to achieve proper flame size.
*EACH ADJUSTMENT OF NO MORE THAN ONE-QUARTER TURN
SHOULD BE ALLOWED TO STABILIZE FOR FIVE MINUTES BEFORE MAKING
ANY FURTHER ADJUSTMENTS ON EITHER HIGH– OR LOW-FIRE.
*MAKE SURE THE FLUE PRESSURE IS CORRECT BEFORE MAKING ANY
CARBURETOR ADJUSTMENTS.
The carburetor on your Oil Classic has a main float valve internally to regulate the oil
level in the stove. It also has a separate, second safety float that can trip off if the oil level
becomes too high in the carburetor. Should this occur, you can reset the safety lever by clicking
it back down to start. You may need to reset the lever several times before the level of oil in the
carburetor returns to a normal level. Your Oil Classic has been rigorously tested to both U.L.
896 and U.L. 307A for both residential and mobile homes, and should the fire snuff out for any
reason, the carburetor will not allow more than 3/4” of oil in the bottom of the burner.
IT IS IMPERATIVE THAT THE STOVE IS BURNING PROPERLY AS
EXPLAINED ABOVE. A POOR DRAFT OR POORLY ADJUSTED STOVE COULD
CAUSE THE STOVE TO SOOT AND BUILD UP GASES INSIDE THAT COULD
CAUSE THE STOVE TO GO OUT AND THEN RE-IGNITE ON ITS OWN. THESE
FUEL RICH GASES CAN BE EXPLOSIVE.
Should the fire go out for any reason, NEVER ATTEMPT TO LIGHT A HOT STOVE!
Try to determine why the stove went out and then allow the stove time to cool for 30 minutes before
re-starting following the lighting instructions in this manual. If you have any questions about the
operation of your Oil Classic please check the trouble-shooting section of this manual or call your
dealer.
DRAFT STABILIZER ADJUSTMENTS:
After removing the rear draft stabilizer access cover (the 7”x 7” square cover in the middle
of the stove back), you will see that the draft stabilizer has a weighted adjustment screw that you
will be able to adjust to weigh more or less on the stabilizer shutter to allow more or less air into the
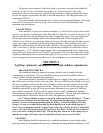
flue. With a suitable manometer, probe into the flue, adjust the weighted screw to where the
pressure reading falls within the satisfactory operating range shown on the chart on the following
page. If the flame or draft is too high (not enough air entering the draft stabilizer) the fire can
flicker excessively and make a roaring noise. It can also appear that the flame is lifting off the
burner top, or the flame pulls away or separates from the burner. If too much air is entering the
draft stabilizer, the flame will be weak and smoky, producing soot on the glass. The flame will be
taller and more yellow/orange in color. This indicates a low negative pressure and inefficient draft.
If a manometer is not available, set the stabilizer while on high burn to the point where the stabilizer
shutter is just closed with little movement needed to push it open or closed. When your Oil Classic
is burning on low burn, the draft stabilizer should be closed, but should wind or any other condition
attempt to increase the draft, the draft stabilizer should be able to flutter open, thereby adding air to
the flue, slowing the draft to a normal draft pressure. Setting pressure with a manometer is highly
recommended. Should the flue be subjected to prolonged high winds or the flue itself is of high
efficiency, the draft stabilizer may not be able to supply enough air for an efficient burn. If this
condition exists, a second draft regulator in the pipe may be fitted to overcome the excessive draft.
Please see chart on following page.
6