


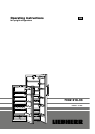
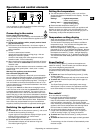


15
K/SK/es..0
GB
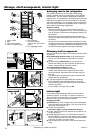
Defrosting, cleaning
Defrosting
The refrigerator compartment defrosts automatically. The
defrost water is evaporated by the heat from the compres-
sor; drops of water on the rear wall are perfectly normal.
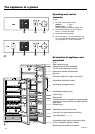
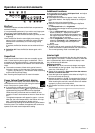
W Ensure that the defrost water can flow freely through the
drain hole in the rear wall (arrow in fig. A).
Cleaning
W Before cleaning, always switch off the appliance.
Disconnect from the mains or unscrew or switch
off the fuse.
W Clean the outer walls, inside and equipment by hand with
lukewarm water and a little detergent. Because of the
risk of injury and damage to the appliance, steam clean-
ing equipment should not be used.
W We recommend using a soft cloth and an all-purpose
cleaner with a neutral pH value. Only use food compatible
cleaning and care agents on the inside of the appliance.
W
Use a commercially available stainless-steel cleaning
agent for stainless-steel appliances*.
- In order to achieve best possible protection, apply a stain-
less-steel care agent uniformly in grinding direction after
cleaning. Points which are darker at the start and a more
intensive coloration of the stainless-steel surface are nor-
mal.
- Do not use abrasive sponges or scourers, do not use con-
centrated cleaning agents and never use cleaning agents
containing sand, chloride or acid or chemical solvents, as
these would damage the surfaces and could cause corro-
sion.
W Ensure that no cleaning water penetrates into the ventila-
tion grille or any electrical components, and keep it out of
the defrost drain as far as possible. Wipe the appliance
dry.
- Do not damage or remove the type plate on the inside of
the appliance. It is very important for servicing purposes.
W The butter dish* can be washed in a dishwasher. The
racks, shelves and other components should be cleaned
by hand as they are not dishwasher-safe.
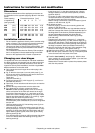
- The shelves and door racks can be dis-
mantled for cleaning. Remove the trims
and sides from the glass shelves. Remove
the protective film from the decorative
trims.
W Clean the drain hole on the rear wall frequently, fig. A,
arrow. If necessary, clean with a thin object, e.g. a
cotton swab or similar.
W The dust should be removed from the
refrigeration unit and heat exchanger
- metal grid at the back of the appliance
- once a year.
Dust deposits increase energy consump-
tion.
W Ensure that none of the wires or other components are
dislodged, bent or damaged.
W Then connect/switch on the appliance.
If the appliance is to be left switched off for any length
of time, empty the appliance, disconnect from the mains,
clean as described above and leave the door open so as to
avoid odours.
Appliance does not work
- Is the appliance switched on properly?
- Is the mains plug properly inserted in the socket?
- Is the socket fuse intact?
The interior light does not come on
- Is the appliance switched on?
- The bulb is defective. Change the bulb as described in
"Interior light".
Loud running noise
- Is the appliance standing firmly on the floor, or does the
compressor cause nearby items of furniture or objects
to vibrate?
If necessary, move bottles and containers apart.
- Burbling noises are normal. These are caused by the
refrigerant flowing round the refrigerant circuit.
A short clicking sound: This will be heard whenever the
refrigeration unit (the motor) switches on or off automati-
cally.
Motor noise: This will be slightly louder for a brief period
when the refrigeration unit switches on.
A low-pitched humming sound is caused by air flow
noises in the fan.
The temperature is not cold enough
- Is the temperature setting correct?
If necessary, set a lower temperature.
- Loose thermometer in appliance is showing a wrong
reading.
- Does the door close properly?
- Is the appliance sufficiently well ventilated?
Clear ventilation grilles if necessary.
- Is the ambient temperature too hot?
(See "Safety regulations")
- Has the appliance been opened too often or left open
too long?
Your appliance is designed and manufactured for a long
life span and reliable operation.
If a malfunction nonetheless occurs during operation,
check whether it is due to an operating error. Please note
that even during the warranty period the resultant servicing
costs in this case will have to be borne by the owner.
You may be able to rectify the following faults by checking
the possible causes yourself:
Malfunction Possible cause and remedy
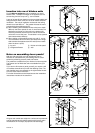
Customer service and type plate
If none of the above causes apply and you cannot
rectify the fault yourself, please contact your nearest
customer service department (see enclosed list for ad-
dresses). State the:
type designation 1,
service number 2and
appliance number 3
as given on the type plate so as to
ensure rapid, accurate servic-ing. The
type plate is located inside the appli-
ance on the left-hand side.
Troubleshooting
* Depending on model and options