10
HC 1001 / HC 1050
A delight in freshness
Reversing Door Hinges
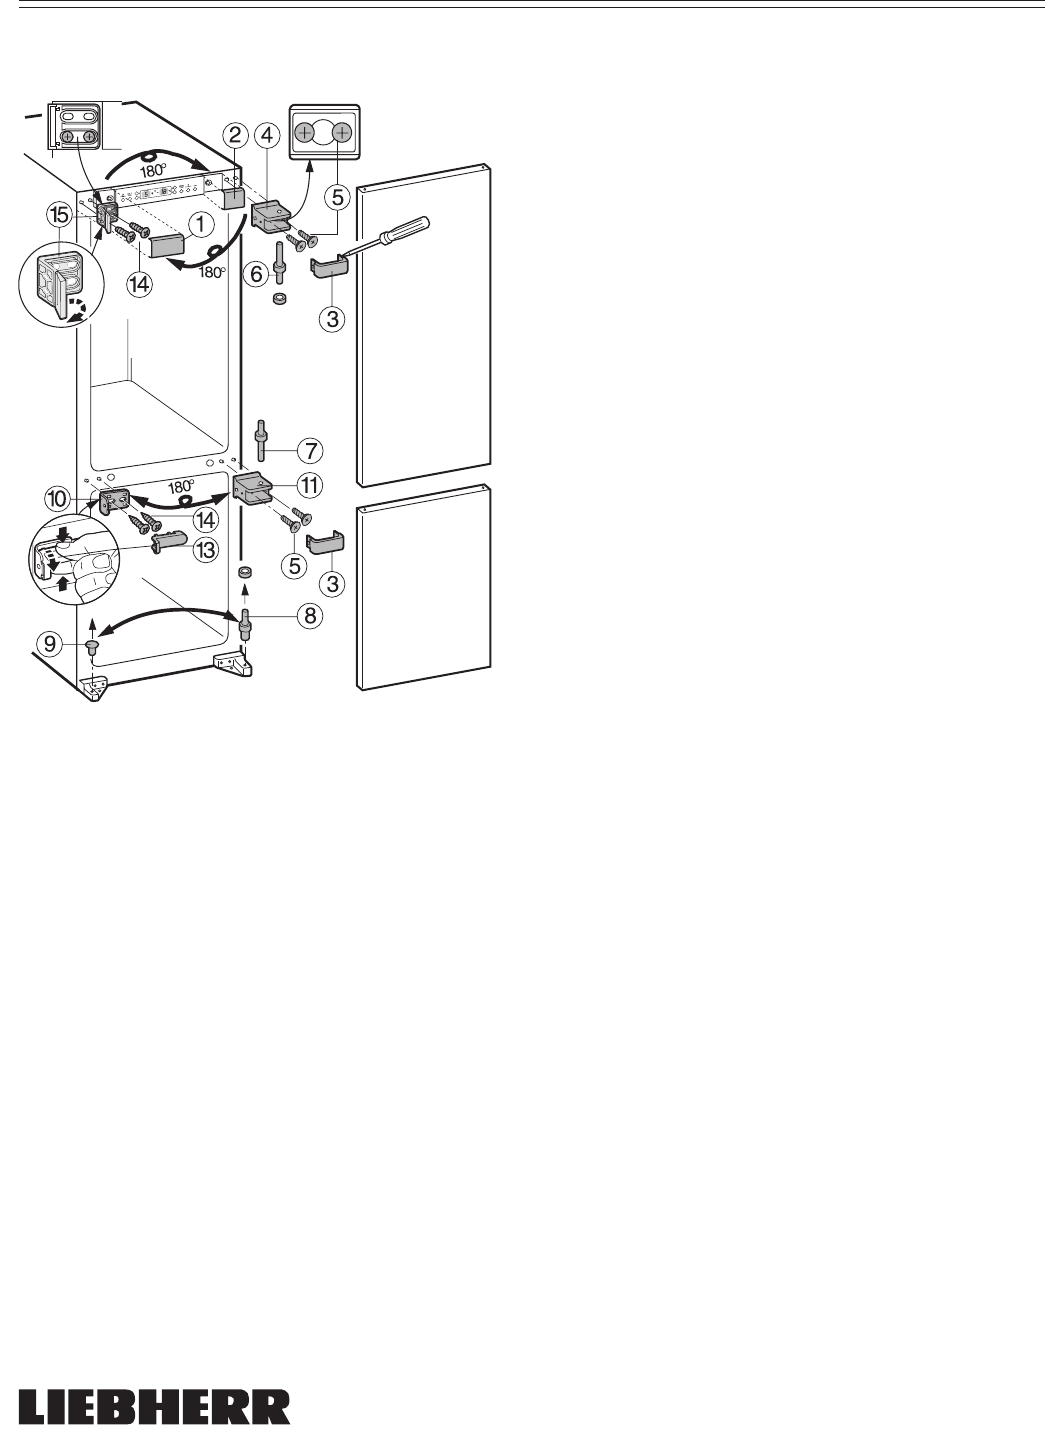
- Figure 10
Figure 10
The door hinges can be changed from one side to
the other if desired.
1. Pull off the covers (Fig. 10, 1) and (Fig. 10, 2).
2. Open bracket (Fig. 10, 15) and remove screws
(Fig. 10, 14). When installing into the kitchen
cabinet, replace bracket on the opposite side
using the same screws.
3. Using caution, press in the side of the hinge
covers (Fig. 10, 3) with a tool and remove
covers.
4. Unthread the outside screw (Fig. 10, 5) in
the hinge, halfway. Remove the inside screw
completely.
5. Open the top door slightly. Push the door
and hinge (Fig. 10, 4) out and remove
simultaneously.
6. Remove the hinge pin (Fig. 10, 7). Pull out the
bottom door and remove.
7. Remove the plug (Fig. 10, 9).
8. Transfer the hinge pin (Fig. 10, 8) to the other
side.
9. Remove the bracket (Fig. 10, 10) and cover
(Fig. 10, 13) by pressing the cover together,
then tilt out the bottom. When installing into the
kitchen cabinet, replace on the opposite side
using the same screws.
10. Remove the center hinge screws (Fig. 10, 5).
Remove the center hinge (Fig. 10, 11). Rotate
hinge 180° and install on the opposite side
using the same screws. Thread the outside
screw halfway in. Attach the hinge through the
keyhole-shaped hole and slide in. Tighten both
screws.
11. Place the bottom door on the hinge pin
(Fig. 10, 8). Close door and insert the center
hinge pin (Fig. 10, 7) with the longer side down.
Be sure washers are in place.
12. Place the top door on pin (Fig. 10, 7) and close
door.
13. Place the top hinge (Fig. 10, 4) together with
pin (Fig. 10, 6) with the longer side up in the
door mounting hole. Tilt the door away
slightly and suspend the hinge on the screw
(Fig. 10, 5). Slide the door in and tighten both
screws.
14. Check for proper alignment of all doors. Adjust if
necessary.
INSTALLATION
7082132-02_KIKNv_USA.indd 107082132-02_KIKNv_USA.indd 10 2/28/2005 11:06:30 AM2/28/2005 11:06:30 AM


